Wednesday, January 29, 2014

Guac This Way!

Great news, we're getting domestically grown avocados in this week's Crop Share!!!  AHHHHHHHH!!!!!! That can only mean one thing...GUACAMOLE!  Never has something that looks like rancid baby food ever tasted so very good.  You'll find a ton of recipes out there for guacamole, some of which contain about 15 different ingredients and even hardboiled egg.  Let me stop you right there, right bloody there, egg has no place in guacamole and if you need to add a bevy of seasonings, you are dishonoring the flavor glory of the incredible produce that goes into this dish.  Let the ingredients sing for themselves, as the only help they need is a bit of salt and lime juice to balance things out and bring out the brightness of the flavors.  So what does the guacamole sing when it's done properly?

"So I took a big chance, and gave a second glance, with an avocado that was ready to play.  It wasn't me it was foolin', cos it knew what it was doing, when it told me how to gauc this way!  Gauc this way!  Talk this way!  Gauc this way!  Talk this way!  Just give me chip!"

Yes, that was the guacamole version of Aerosmith's "Walk This Way."  Clearly I can talk the talk, and guac the guac. ;)


Fresh Guacamole


Ingredients:

3 medium avocados, flesh scooped, pitted & mashed
1 lime, juiced
1 tsp Kosher salt
1/2 red onion, diced
1 clove garlic, minced
1 tomato, seeded and diced
1-2 Tbsp cilantro, minced
1 jalapeno or serrano chile, seeded and diced *optional


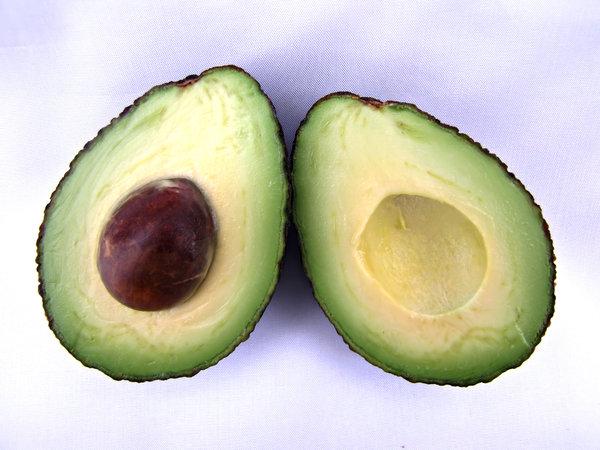
Want to know the best way to get the flesh out of an avocado?  Start by taking your knife straight through it as if you're going to cut it in half, and then just turn the avocado so that you're slicing the whole way around.  Twist each half apart and you'll be left with what you see in the photo above.  Then whack your knife into the pit and pull it out.  Next with your knife, slice three rows down and three rows across through the flesh on each half, and then grab the skin and essentially flip the avocado halves inside out.  The chunks you cut should easily come right out, and it'll save a lot of messing scooping.

In a medium bowl, combine your mashed avocado with all of the ingredients and stir to fully blend.  Adjust salt or lime juice, if necessary.  Serve immediately or really allow the flavors of meld and refrigerate for about 1 hour.  Serve it up the classic way with corn tortilla chips, use it as a topping for burgers and sandwiches, or see our favorite Potato Skins recipe and omit the traditional stuffings and throw in some guacamole or use it along with the bacon and cheese, for a fresh take on a game day classic!

Game on and gauc on!


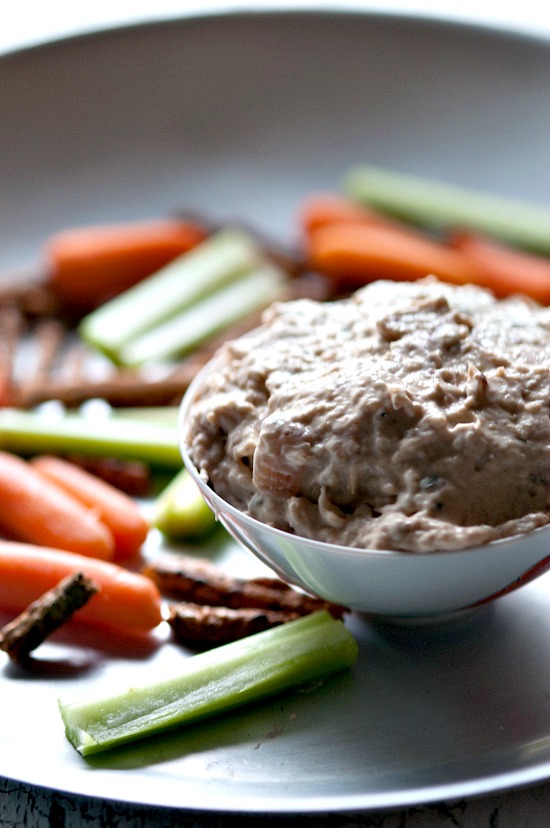
Healthy Caramelized Red Onion Dip via Healthy Green Kitchen

I tend to have a fear of red onions -- long story, but let's blame it on a freshman-year college roommate with horrendous acid reflux and a penchant for subs loaded with raw, red onion.  But when I came across this Caramelized Red Onion Dip from Healthy Green Kitchen, I knew it could make be a believer in "demon onions."  So with Super Bowl Sunday on the horizon, make sure to honor your chips and give them something good and fresh to be dipped in!  If it looks like it's in the same style can as cat food, it's probably wise to leave that on the shelf, and whip up your own easy and healthy onion dip!  Plus, you'll get to put this week's garlic to good use in this dip, too.  Follow the link below to view the recipe...

Caramelized Red Onion Dip


Vietnamese Style Tacos

So when we were going back and forth to Union Market during Christmas tree season, I had to watch in envious pain as everyone, including my own husband, devoured these incredible looking "takos" from TaKorean.  They have found a way to marry traditional Korean flavors and ingredients with one of our favorite Latin comfort and convenience foods...the taco.  But alas, just like most Korean BBQ, none of the offerings at TaKorean are gluten-free thanks to gluten's ability to hide itself in just about every blessed brown marinade.  Curse you gluten!!!  I love tacos and I worship Korean, Vietnamese and Thai cuisine, even if most of I can no longer have.  So after a few odd days of binge watching Korean TV (it should be noted, I don't speak a lick of Korean), I vowed to stop drooling and pouting, because I was going to do some research, follow my culinary gut, and head to the store to procure what I would need for some back to back weeknight delights.  I'm gearing up to make homemade Korean bulgogi with kimchi tonight, but last night, oh last night, I grabbed the cabbage and some of the leftover carrots from the share two weeks ago and set out to create a fusion style taco with all the bright Vietnamese flavors I've been craving (come back to me bahn mi!).  I'd made arepas for the first time earlier in the week, so the Mister begged to have those as the base rather than just a corn tortilla, so these are more open face tacos, or something.  I'm not quite sure what to truly call them other than utterly delicious!  Let's just say I had some again for breakfast this morning!


Vietnamese Style Tacos


For the pickled slaw:

1 cup water
½ cup apple cider vinegar
½ cup sugar
½ cabbage, cored & thin sliced
½ cup cilantro, minced
3 carrots, peeled and shredded
Kosher salt


For the spicy chili beef: 

½ cup sweet chili sauce (I use a brand called Mae Ploy, and can find it at the Giant in Kingstowne)
¼ cup wheat free soy sauce
1 Tbsp Sriracha
1 tsp garlic, minced
1.5 lbs thin sliced ribeye (if you really want the perfect cut for this or for making bulgogi hit up a local H Mart, it's worth the extra trip -- alas, I did not have the time to make the extra trip)
2 Tbsp sesame oil


For the arepas (or if you prefer, just use corn tortillas):

2 cups white corn masa (can be found in the Hispanic food section of most grocery stores)
1 tsp kosher salt
3 cups warm water
Butter for frying (I use Earth Balance margarine for dairy free, but beware it's melting point and it's burning point are much lower than regular butter)


Make your slaw a day in advance if possible, if not, just allow yourself at least 30 minutes to an hour for the flavors to meld and begin to pickle the veggies.  In a small saucepan, heat the water, vinegar and sugar until the sugar is fully dissolved.  Remove from heat and allow to cool.  Prep your cabbage, cilantro and carrots and then toss into a bowl.  Pour the liquid over, and sprinkle with a pinch of two of Kosher salt and toss to fully combine.  Cover bowl and place in fridge for at least 30 minutes up to 24 hrs (the longer it sits the better).

In a medium sized bowl, whisk together your sweet chili sauce, soy sauce, Sriracha and garlic, till fully combined.  Then add in your sliced ribeye and toss to coat.  Set aside and allow to marinate while you prep the arepas.

Next, prep your dough for the arepas.  If you're not familiar with these, they are fried white corn cakes, so think of a crispy, savory pancake.  In a bowl stir together your masa, salt and warm water until there are no more masa lumps.  Allow to rest for 5 minutes.  Melt a tablespoon or two of butter in a skillet over medium high heat.  Take a handfull of arepa dough and pat it out into palm sized rounds about 1/4 inch thick and place into sizzling butter.  Brown each side for about 4 minutes until both sides are golden, then transfer to a separate place to cool.  Once you're about half way through the dough, time things so that you can begin to cook up your beef while a batch of arepas cook.  Then do the fun juggling act of tending to both!

In a large skillet, heat your sesame oil over high heat, but take care to not allow it to burn.  Once you start to see little bubbles in the oil, that means it's ready so pour in your beef, marinade and all, and toss with tongs to cook.  Cook beef on high heat until you can no longer see pink on the meat, and no longer otherwise you're going to have chewy bits of beef.  Remove from heat and set aside to cool.

Finish cooking up all your arepas and then begin the assembly process.  For each serving, place 1 arepa on a plate and top with beef. Use a spoon to drizzle some of the pan sauce over the beef and arepa for extra favor.  Then top the beef with a generous dollop of the slaw, and if you're a heat freak like me, grab that bottle of Sriracha and drizzle some extra over top the slaw.  Devour immediately!

We ended up with more arepas and slaw than beef, so problem solved, they made a delicious meat free pairing sans the beef.  It was my lunch today.  Yes, I've had three meals out of this dish, and I'm debating whether to be a really good wife and let the Mister take leftovers for his lunch on the night shift, or just go for round 4 for my dinner.  I'm not feeling like so good of a wife right now when I know what's hiding in my fridge.  And yes, this reheats superb, just heat an arepa topped with beef for about 30 seconds to a minute and you're set to top with slaw, devour, and repeat!


Tuesday, January 28, 2014

The Girl Who Worked With A Pig

Some of you have already heard the bittersweet news, but this Friday, the 31st, will be my last day at Nalls Produce.  Before you start frowning (or maybe even cheering!), let me tell you a story that brings us to where we are this week...


My friend Clare drew this for me when I got the job at Nalls


Nalls is not the first family business I've worked for, in fact, until this past year, I'd essentially been born working in a family business, my family's business.  My Da is certified Prosthetist Orthotist (I know, big, weird words, so suffice it to say he fabricates and fits artificial limbs & orthopedic braces, so things like the Paralympics and the scene in Star Wars where Luke gets a cool new hand were a big deal in our house) and my Mama is the Office Manager of the facility.  When I graduated from college with my Political Science degree, a whole series of events landed me becoming full time at their office as the Accounts Manager, which was always comical for a girl who was practically allergic to math.  In 2011, when the Mister and I got married and moved out here, my job came with me as I continued to work remotely from home, and it was wonderful...until it wasn't.  Changes to healthcare and just random blows to the business (oh hello roof, so glad you decided to pour water into the entire building) made it incredibly stressful and we were all looking for a way out.  About this time last year, that way out arrived in the form of a larger company that was willing to buy the business, but with one big caveat -- due to strong nepotism rules, I was automatically out once the ink was dry.  My folks struggled with the decision, and honestly, I celebrated in secret.  It was scary to think about a job hunt, was I even employable as the girl who just always worked for her parents?  But I'd let resentment build up so much and I'd lost my ability to see the good in the work that I was doing, so I saw this as my chance to be free.  We talked and I was given wings to hunt for another job, and I promised that I'd keep doing as much of my job for them as I could until the sale went through.  That same week I found out that Nalls, this local business that I loved and where I was one of those weird Crop Share members who got a little too excited about the produce each week, was hiring a new Marketing Director.  Did I have a lick of marketing experience?  NOPE!  But dangit if I wasn't one of those activist kids in college who could convince anyone why you needed to care about such and such a cause, so it's pretty much the same thing, right?  In the end I found out, yeah it kind of is, but man did I learn a lot, grow a lot, and challenge myself to do more than I knew I was capable of.  

My very first day at Nalls - I realized looking thru photos that much of my time there was documented via my feet, ha!


The sale of my parents business drug on and I founded it harder to evenly balance the two jobs, and in the end I let things for their business slack as I figured, hey the sale is going to happen any time now, it'll be fine.  Summer came and went, Fall arrived and a whole new slew of reports were needed for this company, so it must mean the end is close, right?  Then the week of Christmas my parents get the news...the sale is dead.  They were devastated at first, until they learned some pretty horrifying information on the real plans that this company had for our family's business and let's just say they were going to dismantle everything my parents had given their blood, sweat and tears to build, and everything that makes our facility one where our patients say they feel like they're with family.  That knowledge rekindled their fire to fight, but they waited to tell me until after the holidays so it didn't have to darken my door.  Early this month when my Mama told me, I knew immediately the only option for me was to return full time to the business.  Not out of a sense of blind obligation, or martyrdom, but for the first time I was able to see the value, the joy, and the honor of working for my family's business and I wanted it back, I wanted it back so very badly.  But...I've got this other job, that I really love...and there's a pig.

Penny loves my purple Chucks


I deliberated and prayed over a few days and then in my heart, I knew the answer was clear.  While I could try to juggle both jobs, or go super part time for Nalls, I knew how bad I failed at that trying to do the same thing but in the reverse this past year, and I also knew, I need to have just one job, just one, because I have a husband, and family, and friends, and just so many people I've yet to even meet to care for, and I need to have time to do just that.  So one chilly morning I broke the news to Valerie, and she was just beyond supportive and so gracious.  She's in the exact same position as me as the daughter of the Nalls, so we've shared a lot stories about the trials, tribulations and joys of gutting it out with the family business.  Sure, you know in the back of your mind, you could go anywhere, probably make more money, and certainly make a bigger name for yourself, but man, think of everything you would miss.  I tried a little of that adventure this past year, and while I would not trade any of my time at Nalls and the wonderful people I've had the chance to work with and to serve, I have so missed being a daily part of my family's business.


Monsoon season at Nalls


So, as I head into my last few days at Nalls, it's with a lot of mixed emotions.  I'm excited to get back into the fray with the family business and see if we can't just maintain things, but now even grow.  But I am so going to miss all of you, our customers who truly make working at Nalls a joy rather than just a job.  And yes, I'm going to miss seeing Penny Pig every day, because you really can't have a bad day when that little porker trotts after you and tugs on your pant legs.  D'awww!!!  Friday my heart will be rather heavy as I see most of you during Crop Share pickup, but know that I'm staying in the area and will continue as a Crop Share member, so I'll still see many of you, we'll just all be on the same side of the counter from now on.  And for the meantime, while my other duties at Nalls will fall away, I will continue here with the recipe blog, as I'm psychotic enough to enjoy this and I'm going to be cooking with the Crop Share every week any way.  So should you have the itch to get your feet wet (literally, absolutely literally, see above photo!) with an amazing local business, Valerie will be putting out a hiring call for my position soon, and you can download an application here and then hand it in or e-mail it to info@nallsproduce.com.  And as I said, I'm not leaving the area and I'm sure you'll all see me from time to time bopping about Nalls with my Crop Share and far too many succulents once Spring arrives, but for anyone who wants to keep in touch, feel free to contact me at tara@nallsproduce.com, and I'll give you my personal contact info.

It has truly been a joy and an honor to serve each and every one of you over this past year.  Thank you for all the wonderful memories and for all the ways you were bright spots even on the most frustrating or dreary days, and I covet your prayers and best wishes as I rejoin my own family in the great adventure that is small family business.  I won't say goodbye, I'll just say...see you around the Crop Share!

Admit it, your gonna miss this crazy face!


What's Cookin' In Your Kitchen

It's no surprise that we've got some pretty talented foodies in our Crop Share midst.  But good gravy folks, we've clearly gone wrong by not just showing up at some of your homes for dinner!  I was pouring over the Instagrams tagged with #onlyatnalls and all I can say is...dang, I am hungry now.  So while I await the dinner invitations to pour in (*hint hint*), here are some of the most drool-worthy photos to come out of some of our members' kitchens over the past few months.  Hopefully you'll find as much foodspiration from these culinary creations as I did...or at least go raid your pantry for something to nosh on while you scroll!

Without further ado, I give you a glimpse into the Crop Share family kitchen...


Natalie Fortunato just got onto the #onlyatnalls bandwagon, but she's already making us drool over her veggie-tacular delights!  Who needs meat when veggies look this hearty and delicious?!

"Minnesota Winter Chili" with Crop Share Veggies - perfect for this Polar Vortex Part Deux


She calls this a "lazy girl's lunch" but we think this Vegan Taco Salad with Boston Lettuce looks anything but lazy!


Natasha Gannon is so addicted to Crop Share apples she's declared her need to attend AAA Meetings - Apple Addicts Anonymous.  When she's not eating all the apples or Instagramming what she's made with them, you can find her running (literally) around town and doing her own healthy food blogging over on Tash's Noshes.  If you just enter "Tash" into the search box in the top right, you can see some of the recipes of her's we've shared here on Nalls' Kitchen.

Quick Apple Crisp in Mason Jars with Cameo Apples


Louise Burnett not only  has a completely infectious smile (it even shines through in her e-mails), but she also has the uncanny ability to sneak extra veggies into any dish.  Having mac & cheese?  She's going to throw at least 2 extra veggies into it!  Making soup?  Prepare to eat an entire week's worth of produce in one bowl.  I imagine her meals to be like Mary Poppin's bag, there are items in there you can't imagine how she snuck that in!  She's also brought you the Squash-Cauliflower Soup, which again is so packed with veggies it could make a vegan blush!

Salmon in a Grapefruit & Dill Cream Sauce with a side of Collards and Squash Puree


Mac & Cheese with Chicken, Acorn Squash & Spinach


Homemade Cabbage Pierogies


Chicken Pot Pies with Sweet Potatoes, Turnips, Red Onion and Corn


Kielbasa, Kale, Black Bean & Mushroom Soup


Ceviche Salad with Spinach, Avocado, Red Onion, Cilantro, Green Pepper, Jalapeno & Homemade Lemon Vinaigrette 


And finally, Bethany Duffy, who brought you the Cabbage & Collard Greens Slaw, may just be the one person who gives me a run for my money in the photographing everything you eat category.  But when you cook like she does, you need to photo document that for posterity.  Some people will show their children and grandchildren photos of them in the throes of athletic greatness...foodies will show their children and grandchildren photos of the delicious dishes we prepared.


Braised Kale with White Beans & Parmesan over Linguini


Making Homemade Pumpkin Puree


Baked Chicken Sausage with Potatoes, Apples & Onions


Early Autumn Minestrone with Eggplant


Spiced Acorn Squash Muffins


Quick Pickles


Kale, Leeks, Cherry Tomatoes, Carrots & Mushrooms Sauteed with Garlic, Herbs & Tomato Sauce, then topped with Mozzarella and broiled into loveliness


Spinach & Mozzarella Mac & Cheese with Chicken and Tomatoes


Pan-Seared Chicken Thighs with Roasted Cauliflower, Cherry Tomatoes, and Olives with Lemon & Thyme


Fresh Mint Margaritas - Bethany is also a fellow believer in drinking her Crop Share.  Good girl!


Broccoli Cheese Soup in Bread Bowls


Pear Walnut Bread


Like I said...I patiently await my invitations to dinner to come flooding in.  Any minute now...any minute...


Homemade Limoncello via Christa Del Signore

Several weeks ago we got some GORGEOUS Meyer Lemons in the store and little did we know it would spawn a limoncello frenzy amongst our customers!  In fact, we'd never had Meyer lemons, but as soon as we peeled back that neon flesh and took a bite, we completely understood what all the fuss was about.  Okay Barefoot Contessa, you win yet another one, we will use the GOOD olive oil and we will use Meyer lemons for all our baking and cocktail needs.  So with all the talk of limoncello, we begged our customers for their recipes and Christa Del Signore answered the call.  And with the name like that, we're pretty certain this limoncello recipe will have us declaring "ciao bella!"

Homemade Limoncello via Christa Del Signore


Recipe:

One bottle (750 ml) Everclear
One bottle (750 ml) vodka (I would recommend a decent bottle, like Smirnoff, but nothing too extravagant)
20 Meyer lemons

Four cups sugar
Four cups water


Wash the lemons in hot water and clean with vegetable wash (organic and nontoxic) and scrub vigorously.
Rinse. Lemon peels are how you create the drink's flavor and color, so it is important that the lemons are clean. I found the vegetable wash at Whole Foods for pretty cheap (less than $3). I've found that nearly every lemon sold in a store is coated in food wax. You need to remove this wax as much as possible before you peel the lemons. I looked everywhere for lemons without wax (Trader Joe's, Whole Foods, local markets) without success.

Peel the lemons (retaining the peels for later) being sure not to peel any of the white part under the peel, otherwise known as pith.
Peeling is another key step. It is very easy to get the pith when peeling. You'll inevitably get some while you're peeling, but if you keep it at a minimum, you should be OK. The pith creates a bitter finish to the limoncello that you want to avoid. We used a super sharp, large-size vegetable peeler to get the peels off. Keep the peel in long strips to make it easier when you strain later. You can use a sharp knife if you're not afraid of losing a thumb. I've heard of others using a zester for this step, but I've found that to be prohibitively tedious, especially if you're doing a double batch, like I did with the last batch.

Put the lemon peels in a large glass container with the vodka and everclear.
I found a great, huge container at CostPlus World Market. Pier 1 has good containers, too. A suntea container could work, but the spigot leaked on the one I got from Jewel. Note: Some people will use only Everclear and some only vodka. I've found that a mixture is the best recipe. You're not so over the top alcoholic by using the Everclear, and vodka alone can be too low in the alcohol content, resulting in a limoncello that freezes in the freezer Ƃ
— which is where it is ideally kept. The higher alcohol content of Everclear prevents it from being diluted to the point where it freezes.

Swirl the lemon peel and alcohol mixture together daily in the jar.

This step can last for as little as two weeks or up to four months.
The longer you leave the peels in contact with the alcohol, the more yellow and lemony your limoncello will be. After two weeks, you'll likely get a limoncello as good as anything you can buy in a store for $20 or so. A little longer will get you the type of limoncello that you can find only in Italy in small shops on the Amalfi Coast (and on Capri) or in the freezers of Italian grandmothers throughout the country.

After you get to the point where you're ready to finish the limoncello, remove the bigger peels with a slotted spoon.
If you want to be especially frugal with your mixture, like I am, remove the peels to another container so that the "drippings" can be poured back into the larger container.

Once you've removed the bigger peels, you need to strain the entire mixture through coffee filters to remove as many of the impurities as possible. You can do this by putting the filters into funnels and straining that way. Note: If you pre-wet the filters with water, they won't absorb as much of the liquor mixture, reducing waste.

Meanwhile, you can be working on the sugar syrup. Mix the sugar and water. Bring to a boil, stirring occasionally. Let boil for at least seven minutes.

Let syrup cool to room temperature, then combine with lemon-alcohol mixture.

At this point you can bottle using funnels. You should ideally let the limoncello "marry" together for a week in the bottle before consuming, but no one's going to fault you if you sneak a taste or two.

If you think that you're going to be making limoncello, start holding onto bottles, especially interesting, decorative ones. Limoncello makes a great gift that's homemade. If you want to stretch your limoncello stash and still spread the love, get miniature decorative bottles with swivel tops from Cost Plus World Market and fill those as the gift. You generally get two good shots from the bottle. My friend, Ed, and his wife gave these as wedding favors, which is the best idea ever. My pockets were full when I left the reception.


Monday, January 27, 2014

Cabbage & Collard Greens Slaw via Crop Share Member Bethany Duffy

You know how we're always saying, "Hey, tag your Crop Share cooking Instagrams with #onlyatnalls so we can see what's cookin' in your kitchen"?  Well one member, Bethany Duffy, has not only heard the call, she is a cooking and tagging wild woman!  I'm not entirely convinced she ever sleeps, or does anything but cook and take the most drool-worthy photos of her food.  So when I saw she posted this Cabbage & Collard Greens Slaw the other day, I knew I had to get my hands on the recipe so we could all share the love.  Behold, the magic that emerges from the Duffy kitchen...


Cabbage and Collard Greens Slaw

serves 4


For the slaw:
!/2 head cabbage (about 8 ounces)
1/2 bunch collard greens, rinsed well (about 8 ounces)
2 carrots
1 small red bell pepper

For the dressing:
1/4 cup mayonnaise, or 2 tablespoons mayonnaise plus 2 tablespoons greek yogurt or sour cream
1 teaspoon kosher salt
1/2 teaspoon black pepper
1/4 teaspoon celery seed
zest and juice of one lemon
pinch of sugar

Whisk all of the dressing ingredients together in a small bowl and set aside.

Remove the core from the cabbage and the ribs from the collard greens.  Thinly slice both into ribbons and place in a large bowl.  (You can also shred the cabbage in a food processor, but I find that often makes it too watery.)

Shred or julienne the carrot and slice the pepper thinly and add to the greens. Pour the dressing over the slaw and mix well, until evenly coated.


Refrigerate 4-6 hours before serving, to soften the greens and blend the flavors.


Oh and Bethany is also a fellow Crop Share cocktail queen!  Check out what she did with the Shenandoah Smoke tea from Runningbyrd Tea Company (now available in store) after she got home on Friday!  Bourbon, lemon and some smokey sweet tea?  Bartender, hit me again!


Cheers!


Wednesday, January 22, 2014

A Case for Cabbage

Cabbage isn't just for cabbage rolls and sauerkraut .  It's pretty darn versatile and its natural sweetness makes it great for roasting or using raw in a slaw as a side or over some tacos.  And when the weather outside is frightful, some bright flavors are certainly in need.  So we're drooling over this Tangy Cabbage Slaw from The Chow, but we're thinking it would be extra delicious with some of the Bartlett pear from this week, cut super thin like matchsticks.  Mmmm!  It would make a great side dish or layer it over some homemade tacos instead of going for the cheese, lettuce and sour cream.  You could even toss in some grilled chicken and serve it like a salad, or give it an Irish treatment and bake up some baking potatoes for some stuffed jacket potatoes with slaw (seriously, slaw in baked potatoes is life changing). Can't wait to give this one a try (recipe linked below)!

Tangy Cabbage Slaw


Not a fan of the slaw, then enjoy some of our other past cabbage recipes...


Colcannon


Simple Roasted Cabbage


If you've still got broccoli from last week...Szechuan Noodles with Broccoli & Cabbage


Cooking With Collards: Stewed Collards with Sausage & Quinoa

If you're at a loss with what to do with the collard greens coming your way this week, take heart because if you love kale, you'll love collards.  They're really interchangeable and I've used them to make delicious Collard Chips and Sweet Potato & Collard Soup.  But my all time favorite preparation is Sukuma Wiki, a Kenyan recipe for stewed collards.  You get all the goodness of traditional stewed collards, minus the pork fat of most US recipes.  Penny will thank you and so will your waistline.  So a few weeks ago I took home some collards in order to make another batch of Sukuma Wiki, but I also had some quinoa in my pantry that was looking so lonely and unloved.  Thus a go-to side dish of ours transformed itself into an entree with the addition of quinoa and turkey sausage.  The results were delicious, and while not traditionally Kenyan, it definitely had my tastebuds shouting, "Jambo!" (hello in Swahili).


Stewed Collards with Sausage & Quinoa


Ingredients:

1 cup quinoa, cooked to package directions
3 Tbsp olive oil
1 sweet onion, chopped
1 Tbsp garlic, minced
1.25 lbs hot Italian turkey sausage, casings removed and crumbled
2 cups diced tomatoes
1 bundle of collards, removed from stems and rough chopped
6 cups reduced sodium chicken stock
Salt to taste


Prepare quinoa according to package directions.

In a large skillet, heat olive oil over medium high heat.  Add in onion and garlic and sweat until translucent for about 2-3 minutes.  Add in crumbled sausage and cook until it begins to brown.  Stir in tomatoes and cook for an additional 4 minutes.  Now begin to add your collards, and you'll have to add them in stages to allow them to cook down and make more room for the rest.  Once all collards are in the pan and have started to wilt, begin adding chicken stock.  Bring to a simmer and reduce heat.

Now at this point you could simmer everything for about 10 minutes, season to taste with salt and serve this as a soup (though if you've made the quinoa, now you have lonely quinoa or you could stir some in to function like a pasta or rice), which I'm sure would be delicious.  But to really get all the loveliness and to stew the collards into submission you want to simmer this for a good 50 minutes.

After 50 minutes, stir in your quinoa and allow to cook on low for an additional 10 minutes or until all the liquid is absorbed.  Remove from heat and serve.


Baked Penne with Turkey Sausage, Mushrooms & Roasted Red Peppers

All this cold weather is like a proper northeast Ohio weather, and when the temps plummet and schools are closed, we fire up our ovens and bake something filling and hearty.  Williams-Sonoma had tempted me with an Instagram of this Baked Rigatoni with Fennel, Sausage & Pepperonata, and I vowed and drooled to make my own version.  Naturally I went with what I had on hand, which was no fennel and no pepperonata.  But I did have cremini mushrooms and a jar of roasted red peppers, so the following baked, ooey gooey goodness was born.  We'll be serving up some cremini/baby bella mushrooms in this week's Crop Share, so beat that winter chill with this dish this weekend.


Baked Penne with Turkey Sausage, Mushrooms & Roasted Red Peppers


Ingredients:

12 oz penne
2 Tbsp olive oil (plus extra to grease baking dish)
1 Tbsp garlic, minced
1.25 lbs Hot Italian Turkey Sausage, casings removed and crumbled
1 pint mushrooms, sliced
1 cup red wine, plus an extra slosh for good measure (I used a pinot noir)
12 oz roasted red peppers, drained thoroughly
26 oz marinara sauce (I used Nature's Promise organic Garden Vegetable Sauce)
1/2 tsp ground black pepper
Pinch Kosher salt
1/2 cup plus 1 heaping spoonful more of Tofutti Better Than Ricotta (or regular part-skim ricotta), plus extra to crumble on top


Preheat oven to 425 degrees F.  And use olive oil to grease a 9 x 13 baking dish.

Cook pasta to package directions.  In a skillet, heat olive oil over medium high heat.  Add in garlic and cook for 1 minute.  Crumble in sausage and begin to brown.  Once sausage begins to brown, add in sliced mushrooms.  Once sausage is cooked through and mushrooms have also browned, deglaze skillet with red wine, scraping any lovely bits off the bottom of the pan.  Stir in drained red peppers and marinara sauce, season with black pepper and salt, cover skillet, and bring to a simmer.  Reduce heat to prevent burning.

After simmering for about 4-5 minutes, remove from heat and stir in ricotta of your choice.  Then pour over drained, cooked pasta and fold in to fully incorporate.  Pour into greased baking dish and dot top with additional crumbled ricotta.

Bake for 10 minutes until bubbly.  Remove from oven and let cool for a few minutes to allow dish to set up.  Reheats fantastic, seems to get better with each subsequent day.


Broccoli Pesto

I've got a fever, and the only cure is...MORE PESTO!  I've gotta have pesto, baby!  Ever since my Cilantro Pesto escapades, I've been obsessed with making it in just about any form I can.  We're talking, "I can't live if living is without you!!!!" levels of pesto obsession.  So last night, this past week's broccoli made its way into a new batch of pesto with delicious results.  You can't taste the broccoli in it, so this is an excellent way to sneak more veggies into your family's food without them having to actually eat the happy little trees.  This recipe makes a lot, and by a lot I mean after tossing about a cup of pesto with my pasta, I still have a full pint jar full of pesto.  Oh the possibilities!  Or maybe just hand me a spoon...

Broccoli Pesto


Ingredients:
1 cup roasted, unsalted almonds
2-3 cups basil leaves
1 cup olive oil, plus extra for drizzling
6-8 cloves garlic (depending on how much garlic punch you like)
4 Tbsp lemon juice
1 head of broccoli, florets trimmed and blanched
1/2 tsp Kosher salt
Pasta of your choice

In a pot bring water to boil and add broccoli florets.  Allow to blanch for 3 minutes or until broccoli is not longer bright green and has stopped floating on top.  Remove with a slotted spoon and place directly into a bowl of ice water to stop the cooking process.  Rinse out pot, and refill with water (or use same water if you don't mind an extra broccoli flavor to the pasta), bring to boil and add pasta to cook to package directions.

In a food processor, add your almonds, basil, olive oil, garlic and lemon. Blend until smooth.  Strain your broccoli out of the ice water and add to food processor.  Add salt and blend until fully smooth, taste and adjust any lemon juice, garlic or salt, as needed.

This makes A LOT of pesto, so half the recipe if you don't want the leftovers.  As you really only use about 1/2 cup to 1 cup of pesto to toss with your pasta.  Add a few more glugs of olive oil when tossing with pasta to keep everything from sticking, and adjust with a pinch or two of salt.

With the remaining pesto, keep in an air tight container and use instead of mayo on some BLT's, toss with some roasted potatoes and olive oil for a fragrant side dish, or use as an appetizer spread on crostini with cheese and meats.


Thursday, January 16, 2014

BLT Bonanza (plus a bonus recipe for Brussels Sprout Chips!)

I get the whole bacon craze, I just am not that insane over bacon (though it was a dark chocolate & bacon bar that caused me to fall off the vegetarian wagon).  That being said, if you slap that bacon on a carb and add tomato & lettuce, you better get out of my way because I'm going to go all Shark Week on it!  So a few months ago, I had a mad scientist moment in the kitchen and concocted this sinfully good BLT Pasta.  Yes, there is lettuce in the pasta, because hey, it's a green, it will saute up like spinach.  So, with the cherry tomatoes and Boston lettuce this week, just grab yourself a slab of bacon and your favorite pasta and you're on your way to pastavana (pasta nirvana, but somehow it just sounds like a yoga pose, a yoga pose that I really hope exists and includes eating pasta).

Bacon Lettuce Tomato Pasta


But wait, there's more!  With last week's green leaf lettuce and the tomatoes in store, I whipped up some Triple Decker BLT's.  Now a traditonal BLT needs no recipe because duh it's toasted bread with lettuce, a slice of tomato and crispy bacon.  Easy enough.  But most folks slather mayo on them, and since the Mister has an egg allergy, and I forgot to pickup Veganaise at the store, I decided to pull out some leftover homemade basil & almond pesto and slather that on instead.  I never want to see mayo near my BLT ever again!  Pesto is king!!!  For the pesto, use this Cilantro & Pistachio Pesto recipe as a base and sub in the basil and almonds for the cilantro and pistachio.  OR...I just came across a recipe for Broccoli Pesto that I'm dying to try, so why not weave another Crop Share veggie from this week into your BLT and use some of the broccoli for a pesto!  I know I'll be leaving out the cheese and adding more garlic to my version, because if you don't have dragon breath after eating pesto, then you didn't do it right.  The Boston lettuce will work great for your "L" but I suggest grabbing some larger tomatoes in store for your "T" as the cherry tomatoes will just fall the heck out of your sandwich.  BUT!  As an added bonus I made Brussels Sprouts Chips, as a healthy side to my leaning towers of bacon.  Let me just say, move over Kale Chips, there is a new green chip in town and it is the muscles from Brussels!  So I'll provide the recipe for those after the photo.


Baked Brussels Sprouts Chips

Ingredients:
1 quart fresh Brussels Sprouts, ends trimmed, exterior leaves discarded
1 - 2 Tbsp olive oil
Coarse ground salt & pepper to taste (or instead throw on some Dizzy Pig's Cow Lick Seasoning -- in store -- that's what I did!)

Preheat oven to 350 degrees.  Pull apart leaves of Brussels Sprouts and spread evenly on a baking sheet.  You may need to core them a bit more to get all of the leaves off.  Then drizzle with olive oil and toss in your seasoning of choice.  Bake at 350 for about 10-15 minutes or until the chips have started to brown and caramelize.  Proceed to eat them all before you walk away from the oven.