Friday, April 3, 2015

They're Finally Here!


We're getting a treat this week.  It's the thing I wait for all winter long.  When spring gets here, so do the artichokes. They've only been a recent discovery for me, but all spring long I could eat them day after day after day.  My six-year-old son also thinks they're very fun to eat.

Artichokes are related to thistles. So, technically, they're a weed.  The artichoke that you see is an unopened flower. If you let it bloom, they turn into very large, beautiful purple flowers.  But don't do that. You're wasting a perfectly good choke!
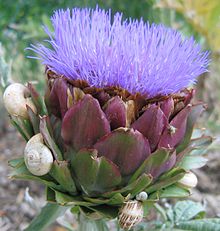
Photo via Wikipedia
If you're not familiar with artichokes, I highly recommend you watch this video clip from Alton Brown.  As a matter fact, if you're cooking anything for the first time, see if you can find a video clip of Alton cooking it. He's a great teacher.  A few months ago, when he was in town, I went to see his live show. I don't think I've ever laughed so hard.

Artichokes are easily made simply by steaming them. What you want to do is cut off the sharp tips on all of the leaves, and then steam them upright until they begin to open. This might be 25 or 30 minutes.  Practice making fancy sauces, Hollandaise or Bernaise or something similar, or even just a vinaigrette, and you're good to go.  

Photo via Cooking With My Kid
There are three phases to eating an artichoke. First, are the leaves. They are tough and fibrous, but when you pull them off right where they attached to the choke they have a whitish flesh that is soft and delicious. So dip that white part in your sauce, and scrape the meat off with your teeth.  This is the fun part.

The heart of the artichoke is the most prized piece.  After eating the leaves, there will be a fuzzy part with purple tips on top of the flat part of the artichoke. The fuzzy part isn't good to eat, so take the edge of a spoon and scrape it all off. Make sure you get it all.  You can cut the heart of the artichoke into bite-size pieces and eat it. Dip it in your sauce.

Photo via Epicurious
The inner part of the stem is also soft and very good to eat. You need to take off the outer husk that's stringy, and then eat the delicate part inside. When I cook artichokes, I use a vegetable peeler to take off the fibrous part before cooking them.

This is my favorite recipe for artichokes.  While they steam, make a simple vinaigrette of Dijon, lemon juice, and olive oil.  Slice the artichokes in half, drizzle over the dressing, and finish under the broiler.  A couple more of my favorites are here and here.

Enjoy!

Thursday, March 26, 2015

Nalls Grow-Your-Own Potatoes Package

Hi Nall's fans, it's Erin again! I wanted to take over Burt's blog for just a second to make an announcement about a cool package we're offering for the first time.


Straw bale potato gardens have been blowing up on our pinterest lately so we decided to offer our very own Grow-Your-Own Potatoes Package! For $30 you get everything you need to build your own garden: 2 pounds of seed potatoes, a bale of straw, compost, and detailed instructions. A straw bale potato garden is exactly what it sounds like. You plant potatoes inside a bale and green plants sprout above the surface while potatoes grow inside the straw. The straw nourishes and protects the plant, so the whole project takes minimal effort, and at the end of the season you have tons of organic, non-GMO potatoes to enjoy!

Photo via Duluth Community Garden Program Blog
This method of gardening has increased in popularity recently because it requires no digging, you won't usually have to deal with weeds, and it doesn't matter if you have bad gardening soil. It's also very environmentally friendly because the straw will eventually break down into compost, which you can reuse next year.

Photo via Sunday Gardener

The instructions are fairly simple. You prep the bale by soaking it with water and compost over the course of ten days, you plant the potatoes, and then you just let it sit until you're ready to harvest. Straw retains moisture, so all you'll have to do is check and water the bale occasionally to keep it from drying out. You can harvest early for tender new potatoes, or just before the first frost for larger tubers.

Photo via Bonnie Plants

We're really excited to offer this new package! Now that winter is finally over, it's a fun and easy spring project that will get your whole family outside. You can register now through April 6th, and pick it up between April 10th and 12th. And you can sign up in person or online here.


Monday, March 23, 2015

First Taste of Spring


One of the earliest of spring veggies is asparagus.  Soon after the snow melts, tender little spears pierce the cold ground and seek the sun.  And they're good for you as well as delicious.  As they appear on our table, they proudly announce the long, cold winter is over and life is renewing itself.

My preferred preparations start with steaming them briefly (they should still snap a bit when you bite into them), or tossing them in olive oil and roasting them in a hot (425-450) oven just until they start to caramelize.  A healthy dose of salt & pepper is all they really need.

Photo via Epicurious
There are some ways to dress them up, of course.  Make a bacon vinaigrette and add roasted asparagus to your favorite spinach salad.  When you roast them, wrap little bundles in bacon or pancetta.  Or, dress up roasted or steamed spears with a drizzle of sauce (a vinaigrette, or a citrus sauce).

Another signature of spring would be pasta or risotto with tender, young veggies such as asparagus.  There are great examples here and here.

Photo via Fine Cooking
Welcome to spring!

Friday, March 13, 2015

Guest Post - Blackened Catfish with Corn Succotash

Hi crop share members - Erin here - you may have met me up at the register or seen me on the floor obsessively adjusting recipe cards. I've commandeered this blog for a post because my family has been part of the crop share program for a long time and I wanted to share one of our favorite recipes with everyone.


The corn we've been getting in the store has been amazing recently, and we recieved beautiful green peppers and onions in our crates last week, so I knew I had to make this catfish with succotash. I discovered this recipe in New Orleans, where my sister lives. Other than Mardi Gras, the best thing to experience in Louisiana is the amazing soul food. Usually soul food does not equal healthy food, but there are enough veggies in this succotash to excuse the bacon.

You know a recipe is good when it starts with bacon. 

Best thing about the recipe? It’s easy! All you have to do is dice up your vegetables, fry them with the bacon, and cook the catfish. Dizzy Pig's Bayou-ish seasoning also gives you that great Cajun flavor, and makes it easy to blacken fish without burning it. To keep your corn as fresh as possible, refrigerate it in the husk and shuck it just before cooking. You can also be flexible with these ingredients. Use white, yellow, or bicolor corn and try substituting tilapia or any firm white fish for the catfish.

Make sure you've got a big enough cutting board for all those veggies.

Now that the weather is getting warmer, try cooking your catfish on the grill. Yeah, it's not summer (or even Spring) yet, but I can dream right? Season the fish and place it on a well-oiled grill at 100° for 3-4 minutes on each side. Also during the summer, throw in shelled butter beans with the veggies. A lot of southerners say it's not real succotash if it doesn't have lima beans. So put on some Louis Armstrong, break out the Tabasco, and sit down to this simple New Orleans-style family supper!

Most of the snow is gone, that means it's time to grill right?


Catfish with Corn Succotash

Ingredients:

  • 2 strips of bacon, chopped
  • 1 1/2 pounds of catfish
  • 2 teaspoons olive oil
  • 2 bell peppers, seeds/stem removed and diced
  • 1 small sweet onion, diced
  • 2 stalks celery, finely chopped
  • 2 garlic cloves, minced
  • 1 teaspoon salt
  • 2 teaspoons of thyme
  • 4 ears of corn
  • 2 tablespoons Dizzy Pig Bayou-ish or your favorite Cajun blackening spice


Directions:


1. Heat large skillet over medium-high heat. Add bacon to the pan; cook 3 minutes or until crisp, stirring frequently. Remove bacon from the pan to a paper towel.

2. Add onion, bell pepper, celery, and thyme to the pan. Cook for 5 minutes or until vegetables are crisp-tender. Add minced garlic, cook 30 seconds, stirring constantly. 

3. With a sharp parring knife, strip the kernels off of the ears of corn into the pan. Stir to mix all the vegetables together. Cover, reduce heat to low, and cook 8 minutes - stirring occasionally. Add the bacon back into the corn mixture.

4. Pat the catfish dry with paper towels. Rub spice mixture evenly over fish. Heat another large skillet over medium-high heat, add olive oil to the pan. Cook the catfish for 4 to 5 minutes on each side or until fish flakes easily with a fork. Serve over the corn mixture.

Servings: 4

Cook Time:  30 minutes


And now back to your regularly scheduled programming!