Friday, September 26, 2014

As the Weather Cools

The pumpkin tunnel is open this weekend!  Make sure to stop by and pick up some pumpkins!
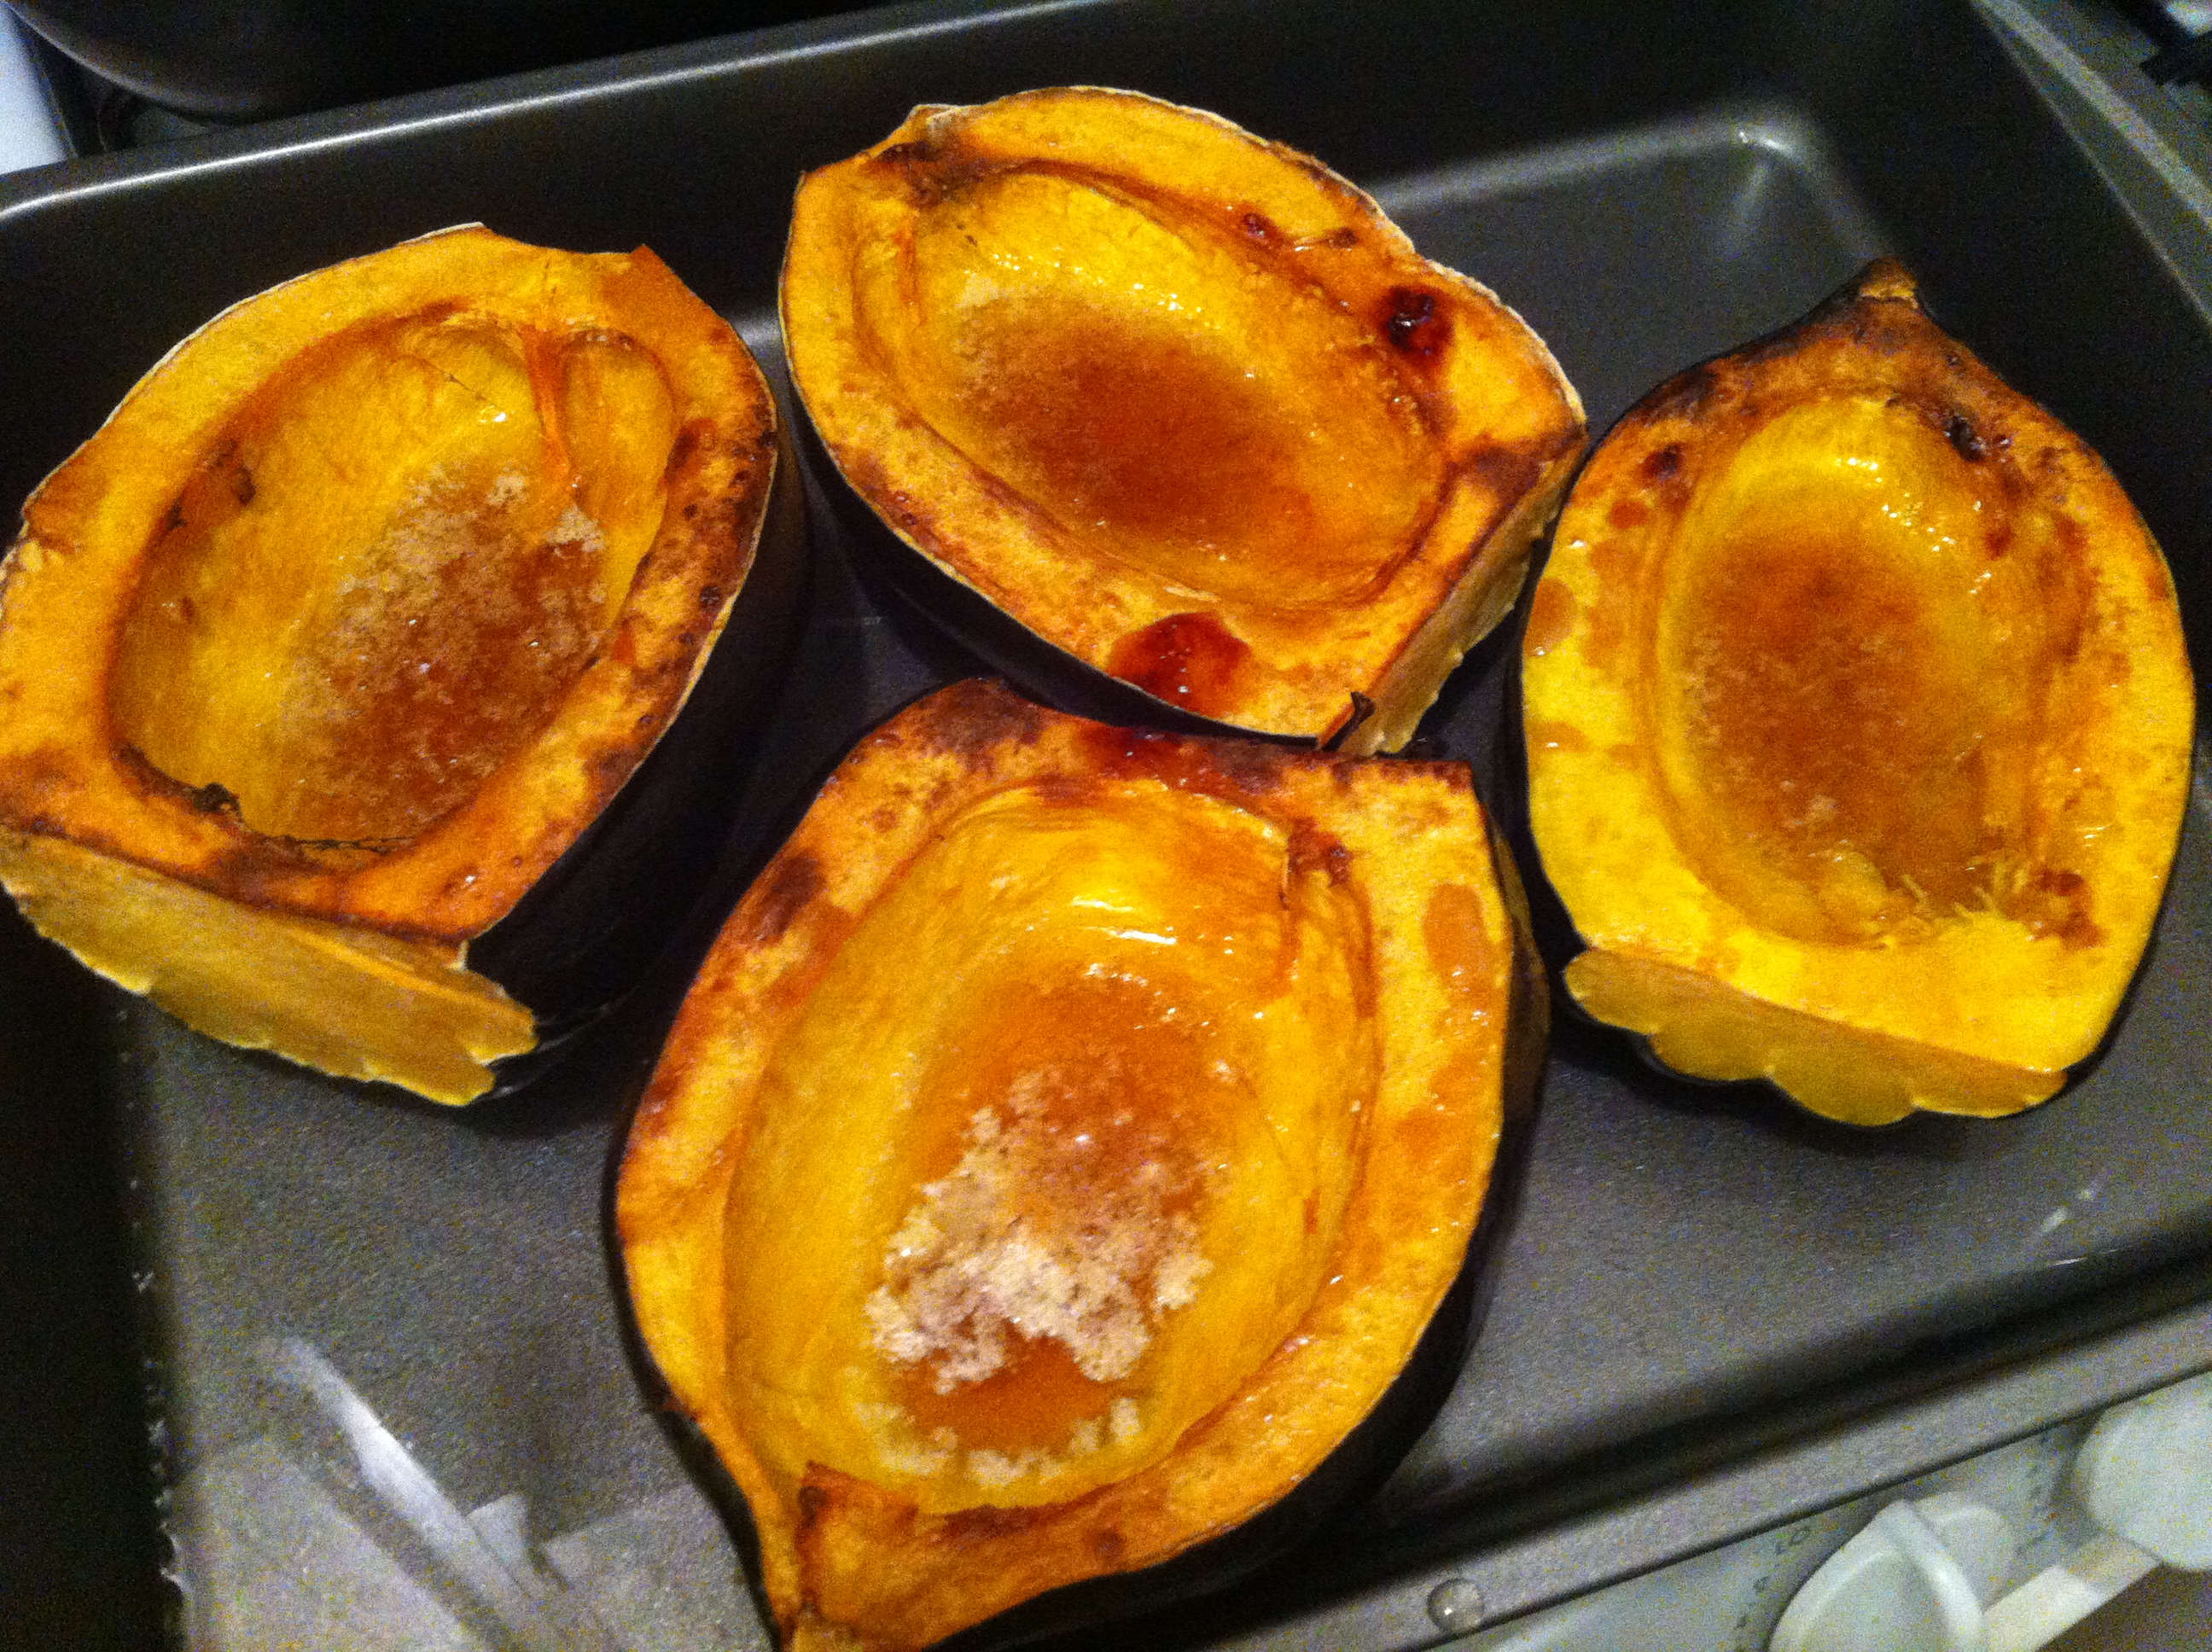
Okay, now it's seriously fall.  Everything is orange now, especially lots and lots of pumpkins.  Jack-o-lanterns?  Well, not quite yet.  But it is time for [drumroll]... pumpkin soup!!  Wahoo!  First things first.  Do not use canned pumpkin.  You will absolutely notice the difference, and it's well worth the effort.  Here's what you do:  Cut the pumpkins in half, regardless of size.  (Be careful, often you have to put some force behind your knife to cut pumpkin or acorn squash.  Use a sharp knife, in other words get yours sharpened, and be extra mindful of where your hands and fingers are.)  Take out the seeds and strings, drizzle with olive oil, and salt and pepper.  Wrap tightly in foil, and bake at 350˚F for about 90 minutes.  Ta da!  It's soft, let it cool and scrape the pulp off the skin.  I put it in 8oz paper cups and freeze it, then take the cup off and leave in a Ziploc in the freezer.  On a cool spring day, it's nice to make pumpkin pie again.

Butternut, and pretty much any other orange flesh squash make really good soup!
As for the soup itself, it's a very blank canvas upon which you can try lots of things.  Boil the pumpkin in chicken, vegetable, or even seafood stock (especially lobster!), add aromatics (celery, onion, carrots, fennel, that sort of thing), herbs and spices, and cook.  Use an immersion blender to purée the soup, and reduce until it's the desired consistency.  Finishing with a little butter or cream makes it even awesomer.

As for what seasonings to use, it's pretty wide open.  Everything from the creole recipe linked above, to curry, to something fancy with saffron will work.  (By the way, if anyone gets the pumpkin bowl thing in that last recipe to work, email me and tell me how you did it.)  This recipe is a hearty version with ham.  Or, for simplicity, I just use the same spices that go in pumpkin pie with just a small handful of brown sugar and some sage.  That one's pretty classic.

It's fall.  Enjoy it while it's here!  I hope to see you and the kids at the pumpkin tunnel this weekend.  Happy soup cooking!

So how much soup would one of the big boys make?


Thursday, September 18, 2014

Acorn squash

Finally!  This week starts winter squash.  Acorn squash, to be specific.  Wahoo!


Yeah, I guess I get excited about these things a little too easily.  But this makes it okay to start fall now.  Great!  So what do we do with it?

Acorn squash is quite the blank canvas.  In most cases it's baked.  Like most winter squash, you'll need to plan some time for this.  Definitely worth the wait!  The recipes we're going to look at today involve cutting it in half, scooping out the seeds, and roasting it.  Usually, this is done in two phases,  First, salt and pepper the inside of the squash, coat with some olive oil, and put it in a roasting pan.  Adding 1/2" water to the pan keeps the squash from scorching and sticking.  Bake at 350-400˚ for about 30 minutes.  Add the filling, and bake it for about another 30 minutes.

It's what gets put back in the center that makes the difference.  Stuffings can be either sweet or savory.  For example, for the savory option, stuffing it with meat and herbs.  Interestingly, acorn squash lends itself to spiced stuffings as well, such as this Moroccan recipe or even this one with hot peppers.

Photo via Food & Wine


A savory-sweet stuffing works well, but you can even make acorn squash into dessert.  Below is a slightly modified recipe I got from a cookbook I found at Mohegan Sun casino's gift shop.  Cranberry-stuffed acorn squash can almost be a dessert!  (For fall recipes, Native American-inspired cooking is full of interesting ideas.  One of my most prized cookbooks is one by the chef at the National Museum of the American Indian.  If you haven't eaten in the cafeteria there, GO NOW.  I'd put it up against any high-end restaurant I've experienced.)

Cranberry-stuffed Acorn Squash
Ingredients:
  • 4 acorn squash
  • 1 1/2 cups whole fresh cranberries
  • 1/2 tsp grated orange zest
  • 1/2 cup apple sauce
  • 1/2 cup maple or brown sugar 
  • 1 tbsp hazelnut oil (do not substitute for this!)
Directions:
  1. Cut each squash into halves and discard the seeds.  Trim the ends so that the halves will stand.  Place cut side down in a baking dish and bake at 350 degrees for 35 minutes.  Cool to room temperature.
  2. Combine the cranberries, orange zest, apple sauce, sugar, and hazelnut oil in a bowl and mix well.  Spoon into the squash.  Place filled side up on a baking sheet and bake for 30 minutes longer.  Serve immediately, with whipped cream if desired.

Sunday, September 14, 2014

Easing Into Fall

Each September, our family spends a week in the Outer Banks.  The crowds have (mostly) dissipated,  but the weather is (mostly) warm enough to still enjoy the beach.  It's sort of a mental transition for me.  The Autumnal Equinox is about the same time, and in my mind we always leave during summer and come back to fall.  So this week is my "limbo" week hanging between the seasons.


But that means it's okay to start making fall things.  During this time of year, when we want something sweet, I whip up some baked apples.  Whip up?  Yes, this is fast and it's easy.  Here's how.

Photo via Wikipedia
The "filling" is just brown sugar, spices, and maybe dried fruit.  I mix up a fairly large batch of it and keep it in a Ziploc bag.  When needed, you hollow out some apples, put in the filling, top with some butter, and bake.  That's it!

So here's what's in the mix:

  • 1 cup brown sugar
  • 1 1/2 teaspoons cinnamon
  • 1/2 teaspoon each ginger and nutmeg
  • up to 1/2 cup coarsely chopped nuts and/or dried fruit (currants, raisins, pecans, walnuts and even dried bananas all work well)
Put it in the bag and mix well.  When you're ready to bake the apples:

  • Use crisp, tart or semi-tart apples.  Wash the outside, then hollow out the core, leaving ~1/2 inch of apple on the bottom.  Yes, this is a bit tricky and takes a little practice.  The best tool I've found for this is a mellon-baller.
  • Fill the hollow with your filling.  Pack it in tightly, then "plug" the hole with about 3/4 tablespoon butter.
  • Put an inch of water in the bottom of a roasting pan, and put in the apples (plug side up).  Bake at 375˚F for about 45 minutes.  You want tender, but not mushy.
Do you know what the best part of keeping a ready bag for baked apples?  It's an excuse to have vanilla ice cream on hand!

Wednesday, September 10, 2014

The Kind That Doesn't Come From Cows

This time of year is a perfect window of opportunity in the canning world.  The last of the peaches are straggling in, and both apples and pears are starting up.  All three of those make for wonderful fruit butters!  Making your own fruit butter is incredibly easy, as well.

Photo via MyRecipes
The following process works for any fruit (or veggie) that you'd like to turn into butter:
  1. Cut up the fruit into small-ish cubes.  Soft, over-ripe or bruised fruit works great in this case; moldy fruit doesn't.  Cut off any suspect-looking spots.  There is no need to peel any fruit, and I use whole apples and pears, meaning seeds, cores and all.  For peaches, you will need to remove the pit.  Add them to a pot that has about half an inch of water on the bottom.
  2. Boil, covered, for about 45 minutes.  The fruit should be really soft and have given up a lot of juices by then.
  3. Use a potato masher or an immersion blender to turn the fruit into mush.  Be careful with the immersion blender, it's easy to liquify the fruit too much.  This is fruit butter, and it should still have some solid texture.  For apples and pears, you will want to use a food mill to catch the seeds still in the fruit.
  4. Measure how much fruit mush you have.  For each cup of mash, add either 1/2 cup of sugar or 1/3 cup of honey.  If you'd like lower sugar content, you can substitute up to half the sugar with Stevia.  You want to add the sugar or honey off heat, and stir really well before you go any further.
  5. This is a great trick that I recently learned.  Put the mush/sugar blend into your slow cooker and prop the lid slightly off the surface.  Here, I'm using a wooden spoon and spatula to do so:


  6. Let it cook down on low until it's the thick consistency of fruit butter.  This will take a few (or more than a few) hours.  Stir every couple of hours.  If you need to let it sit overnight, close the lid all the way and unplug the slow cooker.  In the morning, just re-start the heating and prop the lid up.
  7. Once the fruit butter is the right consistency, it's time to spice it.  Never add any flavoring until it's the right consistency.  (The flavor will concentrate, and you'll have seriously over-done it.)  You can add a variety of spices, and even spirits.  Always do a little at a time, as it's way easier to add more than to take some away.  If using spirits, don't mix it into the large batch of butter.  Put 1/2 to 1 teaspoon in the bottom of each sterilized pint jar, and stir in after filling the jar.  Here are some things I've found that work well:
  8. Fruit Spices Spirits
    Peach Cinnamon, nutmeg, cardamom Bourbon (oh, yeah!), brandy
    Pear Cinnamon, star anise, allspice (those three together ROCK!) Brandy, red wine, cinnamon schnapps
    Apple Cinnamon, nutmeg, ginger, allspice Brandy, cinnamon schnapps

  9. Fill your jars, leaving a quarter inch at the top.  Put the lids on and process in a boiling water bath for 15-20 minutes.  Allow to cool slowly, then test the seals.  Ta da!
Photo via SVkitchen
The above method can work for lots of things not discussed:  plums, winter squash (particularly pumpkin and butternut), apricots...  If you find other spices or spirits that work well, please include them in the comments!


Monday, September 8, 2014

Surviving Fall Crop Share

This week starts the Fall round for our crop share.  Have you had a chance to sign up?  If not, you still can at the first pickup.


I wanted to put up a brief post about this round.  It's different than the summer rounds that we just finished.  During those rounds, most members try to "keep up" eating what's in the box each week.  It's not so hard to do, since tomatoes can be made into a million different things and we don't get bored of them.  Fall, however, requires a different mind set.

Fall crop share is meant to "store up" for the winter.  Lots of things will get ripe, and much faster than we can eat them.  One week, there may be numerous butternut squash or several acorn squash (or both) in one box.  While I really, really love winter squash (particularly butternut), nobody can eat them at that pace.  The intention is that you eat one, and put the others away for later in the winter.  Trust me, that butternut squash soup is so, so much better when the wind is howling and the snow is deep.

Summer fruits and veggies have to be preserved (i.e., canned) in order to be shelf stable over the winter.  Not so with many fall fruits and veggies.  If you have a cool, dry shelf in your basement, putting a dozen squash down there, or half a bushel of apples, is all you need to do.  Periodically, look through what's on the shelf and see if any are moldy.  Get rid of the ones that are so that they don't contaminate the whole lot.  That's it.  So in a couple of weeks when we get a big box full of Virginia apples, you can put some up and they'll be perfect to make your pies on Thanksgiving.

Every few days this blog will have an entry with ideas on using what's in the box that week, just as it always has.  But there will also be tips on how to store each of the items so that excess will last you through the winter.

It's fall!  It's an exciting time for the crop share, and I sure hope you're still coming along for the ride.


Monday, September 1, 2014

A Whole New Meaning for, "Fruit Cocktail"

I apologize to my friends on the Nall's staff.  We've been chattering about doing this post for a few weeks now, and they've been anxious to see what I could do.  Okay, here goes...

Don't think that you need to eat all of the contents of your crop share box.  You know, you can actually drink them as well!  And no, I'm not referring to juicing, either.  Let's talk adult beverages.  The quality and freshness of the contents of your box will really shine forth in cocktails.  Trust me, I've most certainly tried!

Mint
This discussion started when the big bunch of mint came out in the crop shares a couple of weeks ago.  We were talking about what to do with it, beyond making lamb, when the obvious answer came forth:
Photo via liquor.com

Mojitos!  It's really simplicity itself.  Lime wedges, muddled with simple syrup (one part water, one part sugar) and mint leaves.  Use about 3 lime wedges and half a dozen fresh mint leaves.  Add equal parts light rum and club soda, and half as much fresh-squeezed lime juice.  Such a summer classic!  But in my book, there's a better mint option:
Photo via liquor.com

Yes, that's a mint julep.  We think of those more in the spring, particularly during Kentucky Derby weekend.  For me, they're a reminder of trips to New Orleans and the all-night revelry those excursions entail.  (Not to mention watching sunrises in Cafe du Monde, burning my fingers on hot Beignet and my mouth on hot chicory coffee.  Ah, what an end to an evening...)  The mint julep is simply mint leaves muddled with just a little simple syrup, add bourbon (don't be stingy) and ice.  Some like a splash of bitters as well, but I'm more of a purist.

Peaches
The rightful place for peaches behind the bar would be in a bellini, which is simply puréed peaches topped with Prosecco or another dry, sparkling wine.
Photo via liquor.com

Another option I've stumbled across was this take on an Old Fashioned, "garden style."  I'm definitely putting that one on the list.

Those, plus everything else
Then again, the simplest answer is usually the best.  Any fruit you have, any time of year, can make a great sangria.  Sangria is just wine, chopped fruit, and a touch of brandy.  Start with a bottle of your preferred variety of wine.
Photo via Conde Nast

Yes, white wines work extremely well too.
Photo via Rachel Ray

Add in about 4 oz of brandy (again, don't use cheap stuff, but don't waste the Louis XIII either).  Chop fruit into small cubes and let it all marry together in the fridge overnight.  Serve over ice.  Mmmm...

The great part about sangria is that experimentation is heartily encouraged.  Traditionally, some sort of citrus was one of the fruit ingredients.  Of course, you can use anything you can think of.  For me, it's a great way to use up fruit that gets soft.  Based on what fruit you use, you can also switch out brandy for something else, such as Grand Marnier, dark rum, amaretto, limoncello, Chambord... you get the idea.

Photo via mein-schoener-garten.de

One last little option I'd like to show to you.  Rumtopf (literally, "rum pot") is a very old-school German tradition.  It involves a ceramic pot (or you can use glass jars), and over the summer any excess fruit gets cut into pieces and added to the container.  In addition, add sugar equal to the weight of the fruit, then completely cover the fruit with rum.  As summer wears on, the jug gets filled.  Once summer fruit comes to an end, the jug is stored in a cool, dark place until around Christmas time.  The flavors of the fruit plus the extra fermentation creates a wonderful cordial.  Be careful, it will be very delicious and hardly taste of alcohol at all, but the contents are at least the same proof as the rum you used, if not a little more.  I take half of mine and put it in small, decorative bottles for gifts.  The rest, well, Frohe Weinachten!