Friday, June 27, 2014

A River of Zucchini, And An Ocean of Squash


There's lots of squash in your not-too-distant future.  During summer and early fall, we'll see at least some in almost every crop share box.  And, that's a good thing.


What's the most common thing we do with it?  Cut it up, steam, sauté it or grill it, and serve.  Ta da!  Dinner.  I do it too.  As a matter of fact, it's what's on the menu for tonight.  Over the next few months, I'll be doing that a lot.  So will you, probably.  But around late-July, most of us will begin yearning for something else.  It's bound to happen.  I'm a big fan of the old TV show M*A*S*H, and one of my favorite episodes illustrates this beautifully:  After weeks of liver or fish, there's mutiny.


I don't know about you, but I sure don't want to see my family coming into the kitchen with pitchforks and torches like that.  Time to get creative.  One really cool thing to do with zucchini and squash is to pretend they're noodles.  Get yourself a really, really good peeler, and peel them all the way down until you see the seeds.  Now, you have "pasta."

Start easy.  Take your favorite lasagna recipe and sub the noodles with either the shaved squash or planks made with a mandoline.  (You're not going to touch that mandoline without a safety glove, are you?)  Not only did you just use some of that squash, you made your lasagna considerably healthier – and gluten free.  Now how hard was that, really?
Photo via oprah.com

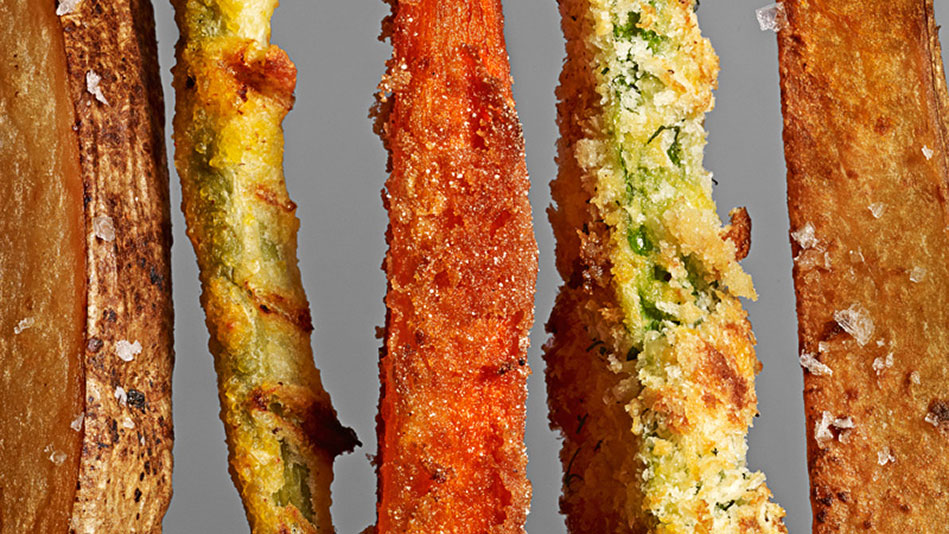
After a couple of lasagnas with leftovers, we're back to our mutiny condition.  Time to get a little more creative.  Last week, I made zucchini french fries (baked ones).  They turned out to be a big hit, especially with the little guy.  Shave your squash, or plank them.  You can pretend they're noodles again, but this time don't hide them in the tomato sauce.  Use them as a salad.  Or just take your favorite primavera recipe, and replace half the noodles with thinly shaved squash (raw).
Photo via foodandwine.com

See?  Lots of options!

Wednesday, June 25, 2014

Don't forget to renew your crop share!

It's renewal time again!  This time, you can now renew online.  Give it a try!

NOTE:  So sorry for all of the confusion. Thanks to some dedicated Crop Sharers, it was brought to our attention that we sent out the wrong registration link. The link above is now correct. If you registered through the wrong link we sent out, we will be reaching out to you to fix it.

How about having summer all winter long?


Oh, that's a beautiful sight now, isn't it?  Fresh, local peaches.  Guess what?  The peaches are starting to be freestone.  This means that when you slice the fruit in half, the stone comes out easily.  In other words, it's a lot easier to cook with them.  As the peaches start to come in, you should save as many as you can.  That way, you can taste summer peaches when we're huddled up in January and February.  There's lots of ways to do this, so let's go over a couple of them.

Photo via canningbasics.com
The easiest thing to do is can halved peaches.  Come winter, we'll use them to make a classic peach pie.  But first, you'll need to skin the fruit.  This is pretty simple.  Get a pot of water boiling, and fill a large bowl with ice water.  On each fruit, make a very shallow "X" on the bottom of the fruit.  Immerse the peaches in boiling water for 90-120 seconds, then promptly move to the ice bath.  When it's cool enough to handle, the skin will easily slip off.  Cut them in halves and/or quarters, removing the stones.

Photo via yearroundharvest.com
In a previous post, we went over how to prepare jars for canning.  Once you've done that, simply arrange the peach sections in the jars.  Peaches are generally preserved in syrup.  The heavier the syrup, the sweeter the peaches will be.  A light syrup would be 1/2 cup of sugar per 2 cups water.  At the heavy end, you could use as much as a cup and a half of sugar.  (To get that much sugar to dissolve, you'll likely have to boil the water.)  Feel free to spice the syrup if you'd like.  Cinnamon, anise, and nutmeg all are great options for peaches.  Simply pour the syrup into the jars over the peaches, making sure they're all submerged.  Leave about half an inch of air space at the top of the jar.  Make sure there are no air bubbles by tapping the jars on the counter.  Seal the lids on the jars, and immerse them in boiling water for 25 minutes.  They need to cool gradually.  The easiest thing is just turn off the burner and let them sit in the water overnight.

Peach butter is another great thing to have over the winter.  In some of your jars, try adding a teaspoon of bourbon or amaretto per pint.  You'll be glad you did!

Monday, June 23, 2014

Let's have a corn roast!

Photo via Wheelhouse Restaurant
I grew up and went to school in the Midwest, so summer means corn roasts.  A big grill, ideally one made of half a barrel, hot coals, and corn husks everywhere... Butter dripping down your chin, the sweet taste of kernels bursting over your taste buds... Wow, it really brings me back.

There are many religious wars fought over the corn on the grill:  should you roast in the husk, in foil, or bare on the grill?  Should you pre-boil the corn?  We Midwesterners are very passionate over these issues.  I'll let you in on a little secret.  They all work very, very well.
My personal preference is to not pre-boil.  If you roast the corn slowly over indirect heat, it takes longer but is worth the wait.  This also makes boiling the corn unnecessary.  Thirty minutes, turning occasionally, does the trick.  I husk the corn and put it in foil because I don't like the silk sticking in my teeth.  (There's a great trick for silk-free husking.)

So, where in this process can you be creative?  In the butters!  My fallback is to roast in foil with butter/margarine, salt, pepper, and smoked paprika.  K.I.S.S. The typical Midwestern corn roast has a coffee can full of melted butter on a corner of the grill into which you dip your corn, and then various seasonings to sprinkle.

Photo via seriouseats.com
An alternative is to create flavored butters/margarines which can be brushed on the corn as it comes off the grill.  The possibilities are endless:  herb butter is a pretty basic way to start.  Indian spices are pretty fantastic too.  For corn I love flavors with a Southwestern trend.  For the brave at heart, use some habañero in chili lime butter.

What's your favorite way to season roasted corn?

Thursday, June 19, 2014

SO SO Much Basil!

There's a good bunch of basil awaiting us all, and that's a wonderful thing!  Most of my 5-year-old's favorite things involve basil.  First and foremost is, "Noodles with green sauce."  Better known as pesto pasta.  Some homemade pesto is such a versatile thing to have, you should always have some sort of pesto at hand. At its essence, pesto is a sauce comprised of an herb, nuts, cheese, and olive oil.  The classic preparation uses basil, pine nuts, and Parmesan cheese.  Here's a basic recipe:

4-5 cups washed basil leaves (no hard stems)
2/3 cup toasted pine nuts
2-3 garlic cloves (optional)
1/2 cup coarsely grated Parmesan
Extra virgin olive oil (use a good one)
Salt & pepper (be generous)

This is SO simple. Put all of the ingredients in a food processor.  Start with about 1/3 cup olive oil.  Pulse until it is a coarse paste.  With the food processor on low, slowly stream in more oil until it looks emulsified.  Ta da!

So you make a big batch, how do you store it?  The best way I've found is to pour it in an ice tray, freeze overnight, then put the cubes in a zippered freezer bag.  The cubes are great for portioning, too.  Use 1 cube for each serving of pasta.  Make enough to carry you through the winter!

Pesto is fun to play with, too.  Parsley, walnuts, and Romano makes for a great sauce, too.  Dill, pistachio, and feta is fantastic, believe it or not.

Buy some extra basil and some grape tomatoes, and you can have a quick summery side:  halve the tomatoes, put in a little handful of basil sliced in thin strips (called chiffonade), salt, pepper, and some good olive oil and balsamic.  Stir well and let stand at room temperature for a little while.  Ta da! My son makes this on his own (well, he still needs a little help slicing the basil).  Cooking is a great way to spend quality time.

What else do you like to make with basil?

Monday, June 16, 2014

Beets! Pass the honey.

Photo via nutribulletblog.com
Plums... now beets.  I think the powers that be had something about making this week's basket all purple.  But, in addition, it's all sweet, too.  In millennia past, beets were used as a sugar source.  Yes, they are naturally quite sweet.  Just remember, they're also naturally quite purple, too.  In millennia past, and even to today, beet juice has been used to make dyes.  So when you cook with beets, wear a shirt you really don't care about.

It's the sugar in the beets that we're going to focus on for now, though.  Beets were used historically as a sweetener, and so was honey.  I love combining beets and honey to make a savory-sweet side dish that's almost dessert!

Photo via Seed to Saucepan
Beets are typically too firm to eat raw.  They can be boiled, roasted or steamed to prepare them to eat.   In doing so, let the skin be your guide.  Wash them very thoroughly and trim off stems and roots.  Whatever route you use to heat them, when they're soft enough to eat the skin will slide off very easily.  And plan ahead, as they take some time to cook.  Halving or quartering the bigger ones does speed the process.  As for the honey, the simplest thing to do is once the beets are soft enough, slice them into 1/4" disks, sprinkle lightly with salt, and toss them in some honey.  Balsamic makes a fantastic glaze, too.  And if you reduce that balsamic a bit first... wow.  Just wow.

Photo via mccormick.com
This recipe is an excellent illustration, and a big favorite in my family.  While parsnips are a little hard to come by this time of year, I have substituted turnips in the spring and the recipe still works very well.  Most any root vegetables will work in that recipe, actually.  Here is a great recipe to use as a starting point for sweetening with balsamic.  Don't forget, brown sugar is a great sweetener too, as in this one.  Note that it also includes lemon, and the acid does help temper the sweetness.  (Weren't the balsamic glazed ones good?  You see what I mean.)

Have a great sugar rush!

Friday, June 13, 2014

Pflaumkuchen! Say that three times fast!

Plums.  Little gleaming rubies, amethysts and garnets shining from the basket, beckoning to you as you walk by.  Sweet, tart, juicy.  mmm...  I love when the plums come in, especially when they get just sweet enough to eat by themselves.  Again, if you want to cook with them, do as little as possible to the fruit itself, and let it shine all on its own.
Every year since I can remember, my family made Pflaumkuchen (German:  plum torte).  It's the simplest thing, but it evokes such strong memories for me.  I remember my mom chastising me for eating the plums as fast as she could slice them for the torte.  I make this at least twice every year myself, and it's the most wonderful thing.

It's really easy.  The whole recipe is a simple tart crust, topped with plums macerated with some sugar and cornstarch.  As it bakes, the juices of the plums seep down into the crust, turning it from a simple, sweet crust into a purple bed of heaven on which the fruit rests.  Here's the recipe:

Ingredients
Crust:
1 1/2 cups sifted flour
1 tsp baking powder

2 tbsp sugar
pinch of salt
1 stick butter
1 egg, beaten
1/2 lemon's zest

Topping:
3-4 cups plums, pitted and sliced
1 tbsp cornstarch
3/4 cups sugar
2 tbsp confectioners' sugar

Directions
1. Mix the dry ingredients for the crust, then cut in the butter until it resembles very fine meal.  A food processor is great for this.  Add egg and lemon zest, work with fingers until very smooth.  Press the crust into a 9-inch pie plate or torte pan, pushing the crust up the edges by half an inch or so.  Flute the edges.  Chill the crust until you're ready to put it in the oven.
2. Preheat the oven to 400 degrees F.  Mix the plums with the remaining ingredients, absorbing their juices, and allow to macerate for 10 minutes.  Stir once more, then arrange plum slices on the crust in a nice pattern.  Scrape the collected liquid remaining in the bowl over the top of the torte.  Bake 40 minutes, until the edges of the crust are golden brown.  Allow to cool completely, then serve with a dollop of vanilla whipped cream.

Welcome to the family!

Thursday, June 12, 2014

Stone fruit season has begun!


That's a scene that just warms my heart. We'll get to see it for the next couple of months.  Large baskets filled with a cornucopia of peaches, plums, apricots and nectarines.  I almost want to dive into the display, head first, mouth open.  I'm about to tell you what you can do with them, but nothing I'll tell you can top this one tip:  eat them.  Eat them whole, just as Mother Nature intended.  Chefs and bakers the world over try every day to take these gems and improve on them. While they make wonderful things for us, no one yet has made something better than eating the fruit itself.
Photo via Davison Orchards

That's not to say we can't make wonderful things.  What I'll advise you, though, is that the less you do to the fruit, the better your dish will be. For example, this recipe for grilled peaches does nothing to the fruit itself other than slightly grilling them.  And it's a wonderful dessert.  My 5-year-old is a huge fan of helping me put nectarines and berries in the food processor, pushing the pulp through a strainer into Popsicle forms, and having a cool summer treat.


Photo via VegKitchen


Over the summer you'll see about an article a week about various stone fruits and ideas for them.  Of course we'll talk about baking, but there will be articles about preserving, cocktails, savory dishes and more.  The next fruit article will be about a dessert tradition in my family this time of year, Pflaumkuchen.

I'm looking forward to a fruit-filled summer.  How about you?

Monday, June 9, 2014

Cucumber Salad just screams, "Summer!"


Another dish that brings back summer days is cucumber salad.  If you remember our post on coleslaw, the debate was vinegar vs. cream-based dressings.  Cucumber salad is much the same premise.  Slice the veggies really thin, then let them marinate in a dressing overnight.  If you found a dressing that works for your coleslaw, then by all means repurpose it for cucumber salad!  I will say that, in my experience, cucumber salads have more add-ins beyond cucumbers than coleslaws do beyond cabbage.

My go-to cucumber salad is one my mom used to make, and it uses some of the fantastic spring onions that were also in last weekend's box.  Slice both the cukes and onions very thin.  I use a mandoline, and it gets the job done in a real jiffy.  A word of caution:  The blade of a mandoline is incredibly sharp.  Never, ever, ever, *EVER* use it without either the included safety guard, or a kevlar glove.  Trust me on this, I have had several trips to the emergency room while learning to use my mandoline and I don't want you to have the same problem.  And isn't that what always gets them on Top Chef? After slicing your veggies, take some dill weed from your herb pots (how are they doing, by the way?) and chop that as well.  So you have:

                         
The dressing is simplicity itself:  

a little squirt of olive oil,
a few tablespoons of white vinegar (to taste), 
salt & pepper, 
and a little water. 

 Put it in a sealable container, shake it up, and let it seep in the fridge overnight.  This is something you'll find in my refrigerator pretty much continuously from now through September or so.

One raging debate about cucumber salad is whether or not to remove the seeds.  I find that when they're sliced thin, you don't have to.  If your recipe calls for more chunky pieces of cucumber, then you probably want to slice it the long way and scoop out the seed compartment with a spoon.  Cukes can definitely be enjoyed skin-on, but in salads I usually peel them.  Pickling cukes, though, traditionally have a thinner skin and are just fine left unpeeled. You don't just have to turn them into pickles! When we just cut them up and serve them at the table with a sprinkle of salt, my 5-year-old loves "stripy" ones (peel half the skin off, leaving a striped pattern along the cuke.)

Have you found any good dressings for cabbages and cucumbers?  I've made this one with tahini (you can find it at most upper-end grocers) which is really interesting.  Here's a creamy one on my list to try with our most recent cache of cukes.  Of course, the ultimate cucumber salad dressing is tzatziki sauce.  This tuna salad has cucumbers in it too, making it really refreshing for lunch on really hot days.

Please share any of your favorites in the comments section!

Wednesday, June 4, 2014

Violet! You're Turning Violet, Violet!

One of my earliest memories is that of picking blueberries with my grandma and grandpa.  I was always especially close with my grandfather, and they took me blueberry picking one drizzly morning.  I remember thinking how huge the bushes looked, and wanting to fill my little white plastic bucket.  At the age of 3ish, though, it was just so difficult to put the berries in the bucket instead of into my mouth.

Blueberries are one of nature's true "super-foods."  They are extremely high in antioxidants.  So you can feel less guilty about eating them by the little white plastic bucket full.

Of course, for the few that survive the ride home after purchase, blueberries make us think of baking.  As previously indicated, I'm not the best baker.  My latest blueberry infatuation, though, is with this lemon blueberry poundcake made with ricotta cheese.  That recipe would only use half of the container of blueberries that were in your share.  I was so anxious to show this cake to you, but of course mine fell while it was cooling.  Ugh.  Another baking option that is a frequent go-to for me is cobbler.  Cobbler is my son's favorite dessert.  He'll eat absolutely any fruit cobbler you can think of.  This one uses cornmeal in the topping, which I thought was quite an interesting twist.  Yes, Nalls has peaches for that recipe too!

Did you try your hand at making jam?  Blueberry jam is pretty straightforward as well.  If you've read at all about reaching a set point for jam, let me clarify that a bit for you.  Reaching the set point indicates that the sugar has gotten hot enough to transform into gelatin.  This happens at 220˚F.  Boil the fruit, sugar, and pectin until it reaches that temperature.  Easier than using a plate or a spoon, use an instant-read or a candy thermometer.  Lemon and blueberry are a classic combination, so last year I had a little bit of a flash of inspiration.  I put my blueberry jam into half-pint jars, and then to each I added half a teaspoon of limoncello (an Italian lemon-flavored liqueur).  A little stir and some time on the shelf and wooooow...

I wanted to include some non-baking, non-dessert item that uses blueberries.  I came across this one for a glaze for ribs.  Hmmm...  I think I found my next project on the barbecue grill!

Go ahead, eat the blueberries.  Getting them all over your face, it's okay.  It just shows how much you enjoyed them!

Stuffed Full of Zucchini

Here come the squash!  Yellow squash and zucchini are staples in our crop share boxes throughout summer and fall.  As one of the most commonly available veggies, I'm always looking for new recipes to use in order to keep my family's interest.  Don't get me wrong, simply sautéed is awesome too.  If you can get the tiny baby ones, those are phenomenal for sautéing.  Just slice the squash in quarter-inch disks, melt some butter/margarine in some olive oil, and put them in.  Salt, pepper, and let them sit undisturbed until the bottom side is beautifully brown.  Flip and let the other side brown, and remove briefly to a paper towel to get rid of any excess oil.  These can be dressed up thousands of different ways.  My personal favorite:  Add just a little minced garlic to the butter and oil, sauté the disks as above, and just before they finish squeeze a lemon over the pan.  Add a little fresh dill and fresh oregano (how's your herb planting coming, by the way?) after you drain them on the paper towel, and finally sprinkle with some Parmesan or feta.  mmmm...

That's not the real thing we're here to talk about, though.  We're here to talk about stuffed squash.  This is an entirely different level.  In general, you slice the zucchini lengthwise, then take the tip of a spoon and scrape out the seed area in the center.  Save what you scoop out, as lots of recipes add this in with the fillings.  Some sort of filling of herbs, breadcrumbs, cheese, other veggies, or even ground meat or seafood is pulled together and spooned back into the hollowed-out zucchini canoes.  Bake it, and you have stuffed zucchini!  This recipe, though, is my dead-on favorite for stuffed zucchini.  The combination of sun-dried tomato and canned artichoke hearts works so well.  This recipe is really good too.  Everything's better with bacon, right?

Another delicacy is stuffed zucchini flowers.  Yes, you can eat the flowers!  These dishes come from Italian, French and Mexican cuisines.  Essentially, some sort of stuffing, frequently cheese based, is put in between the petals of a closed flower.  The flower is then dipped in a batter (tempura batter is good) and then they're fried.  Italian variations frequently use ricotta as the stuffing, with some sort of addition (black pepper, herbs...).  French variations do too.  I'll admit that I haven't really tried any Mexican recipes for squash blossoms, but this one for crab-stuffed blossoms looks promising.  And, for the adventurous souls among us, there's Aztec squash blossom pudding.  Hmmm...

On an unrelated note, I was wandering around Nall's on Friday and there is an incredible collection of hanging baskets full of flowers and plants.  The one below (with coleus) I thought was really gorgeous.  Stop by and take a look!