Showing posts with label vegan. Show all posts

Wednesday, April 9, 2014

Spice Roasted Eggplant

Two Christmases ago one of my dearest friends gifted me a cookbook called Simply In Season because she knew I had just joined a CSA and thought this cookbook based around seasonal produce would come in handy.  I'm embarrassed to say that this week was the first time I dove into the recipes.  That tends to be my relationship with cookbooks, I hoard them, if they have pictures I will drool over them, but once they get on my shelf, I always seem to forget to flip through them rather than sit and ponder what I should make.  Now with Pinterest, my cookbooks have really been feeling neglected.  But thanks to my personal social media fast for Lent, I've been left without my easy compilation of recipes, which meant my cookbooks finally made it back off the shelf, and Simply In Season was the first one I went to.

I was originally on a hunt for something different to do with asparagus, because I wanted to break out of my usual tried and true ways (in pasta, grilled, roasted, sauteed, in risotto, or as "fries").  And I did find a recipe for "sugared" asparagus that I'll be trying out in the next few nights.  But what really caught my eye was this recipe for Spice Roasted Eggplant from a woman in Senegal.  So tonight I baked up some za'atar crusted chicken and paired it with this delicious eggplant recipe.  The original only called for a pinch of cinnamon, but I'm a sucker for cinnamon so I increased it to a whole 1/8 tsp and I thought it was a lovely sweet balance to the heavy spice of the cumin.  For those of you who are cilantro-phobes, you could easily substitute parsley, basil or especially Thai basil.  And if  you have a grill, this would be delicious as grilled eggplant!  The charmoula-like sauce would make a great marinade for fish or chicken or poured over some skirt steak, much like a chimichurri sauce.  So this is definitely one recipe that can take you in multiple directions, especially as the weather continues to warm up!


Spice Roasted Eggplant


Ingredients:

1 large eggplant, sliced into 1/4" thick rounds
1 bundle cilantro, chopped (or use another herb like parsley or basil)
1/4 cup olive oil
2 Tbsp lemon juice
2 tsp cumin
1 tsp ground coriander
1/8 tsp cinnamon

Preheat your broiler on high heat and set top rack in the middle of oven.

In a medium sized bowl, whisk together olive oil, lemon juice, cilantro and spices until well combined.  Then with a pastry brush, brush the marinade onto both sides of the eggplant rounds and arrange onto a lightly oiled baking sheet.
About to get a suntan!

Broil eggplant on middle rack for about 10 minutes total, flipping about mid-way through.  You want to get both sides nice and golden and slightly crisp the skin, so keep and eye to make sure nothing is burning.

Would also be great to turn into a stacked salad with some fresh tomato slices, goat cheese and a few sprinkles of coarse-ground salt and a drizzle of olive oil!

Sunday, February 23, 2014

My Crop Share Challenge: Stewed Collards with Apples

So a little late on last week's Crop Share Challenge, but ah well.  The two random items from last week's share I chose to pair together were collard greens and fuji apples.  In theory, this should work, but will the bitterness of the greens over power the apples?  Will it turn out too sweet for a side dish?  Will my insistence on adding garlic to every blessed dish be a very bad idea here?  Let's find out!

Stewed Collards with Apples


Ingredients:
1 Tbsp olive oil
1 clove garlic, minced
1 small bundle collards, removed from stem and shredded into more manageable bits
2 Fuji apples, peeled, cored and diced into 1/2" cubes
1/8 tsp red pepper flakes
Pinch of Kosher salt
2 cups water

In a medium sized skillet heat olive oil over medium-high heat.  Add in garlic and apples and saute until the apples just barely start to golden, about 2-3 minutes.  Add in collards and wilt completely down.  Season with red pepper flakes and salt, and cook for an additional minute.  Add in water and allow to come up to a boil.  Reduce heat to medium and simmer for 30 minutes.


After about 25 minutes, all of the liquid should be gone.  I thought about pulling it from the heat, but apparently the food sadist in me felt that 5 more minutes was what this dish needed.  So I let it brown up for the additional 5 minutes, stirring occasionally to brown everything evenly and prevent burning.  Once you hit minute 30, pull from heat and serve.

Results...

Oh goodness me the results have rendered my newest collards obsession.  Yes, even better than the Collard Greens Pesto from the other night.  I ate the entire thing myself, which if I'm going to spoil my dinner, might as well be with something like this.  But it would make a fantastic side to a roast pork tenderloin, or oooo roasted duck breast.  Or snag some chicken sausage and sear those up to serve with this for that whole apples & sausage thing.  Am I the only one that thinks any form of sausage should be served with apples or some sort of fruity sweet thing?  This is what happens when your parents let you dip your sausage links into grape jelly as a kid.  Mama & Da, you rock!  So yes, for those of you that are like ewww I hate collards, they're so bitter.  Chuck some apples at those greens and trust me you will fall in love.

Move over kale...collard greens are the new green kid in town!


Stay tuned for this week's Crop Share Challenge because I've decided to pair the beets with the blood oranges!  Both look like a homicide on your cutting board, so why not?!


Presto Pesto: Collard Greens In My Pesto!

Are you tired of me making pesto out of every green thing yet?  Hope not, because this past week, as I was wading through the sea of collards we got in the Crop Share, (Early Spring registration just opened so swing by Nalls on a weekend to snag a new registration form!) I decided to give a go at that Collard Greens Pesto recipe from Southern Living that I'd previously posted.  But I didn't want to have to run back to the store to get pecans and I really didn't even want to blanch those collards because I don't cook the basil before it goes in my pesto, and then it's just another pot to clean.  So I just did my usual base recipe for pesto but threw in a whole bundle of collards in place of the basil, and crossed my fingers for luck.  Oh...my...gosh!  Soooo good!  It may actually be my favorite pesto and the Mister even thought it was incredible.  So if you're still trying to use up all the collards from last week, MAKE THIS PESTO!  I also did not have pasta, so I mixed ours in with a 1 lb of mushrooms that were sauteed in white wine, butter & olive oil, some shredded thigh and leg meat from a rotisserie chicken, and 2 cups of cooked white rice, added another splash or two of white wine and a pad of butter and just let it all simmer down till nearly all the liquid was absorbed.  You can see the final product below, but I'm not including a recipe for the full dish as it was one of those throw in a bit of this bit of that and nothing got timed or measured.

Collard Greens Pesto


Ingredients:
1 cup roasted, unsalted almonds
2-3 cups collard greens, removed from stem and ripped into smaller pieces
1/2 cup basil leaves, removed from stems
1 cup olive oil
6 cloves garlic
3 Tbsp lemon juice
Kosher salt to taste


In a blender or food processor add all ingredients and blend until fully combined and smooth.  If serving over pasta, you'll want to have a little extra olive oil on hand to toss with the pasta.  Or serve this as I did mixed with sauteed mushrooms, shredded chicken and rice in a white wine sauce.  Would also be great over seafood, chicken, or as a sandwich or appetizer spread.


Wednesday, January 29, 2014

Guac This Way!

Great news, we're getting domestically grown avocados in this week's Crop Share!!!  AHHHHHHHH!!!!!! That can only mean one thing...GUACAMOLE!  Never has something that looks like rancid baby food ever tasted so very good.  You'll find a ton of recipes out there for guacamole, some of which contain about 15 different ingredients and even hardboiled egg.  Let me stop you right there, right bloody there, egg has no place in guacamole and if you need to add a bevy of seasonings, you are dishonoring the flavor glory of the incredible produce that goes into this dish.  Let the ingredients sing for themselves, as the only help they need is a bit of salt and lime juice to balance things out and bring out the brightness of the flavors.  So what does the guacamole sing when it's done properly?

"So I took a big chance, and gave a second glance, with an avocado that was ready to play.  It wasn't me it was foolin', cos it knew what it was doing, when it told me how to gauc this way!  Gauc this way!  Talk this way!  Gauc this way!  Talk this way!  Just give me chip!"

Yes, that was the guacamole version of Aerosmith's "Walk This Way."  Clearly I can talk the talk, and guac the guac. ;)


Fresh Guacamole


Ingredients:

3 medium avocados, flesh scooped, pitted & mashed
1 lime, juiced
1 tsp Kosher salt
1/2 red onion, diced
1 clove garlic, minced
1 tomato, seeded and diced
1-2 Tbsp cilantro, minced
1 jalapeno or serrano chile, seeded and diced *optional


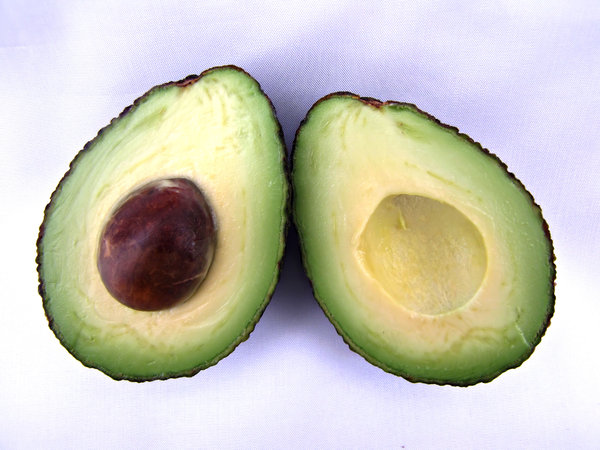
Want to know the best way to get the flesh out of an avocado?  Start by taking your knife straight through it as if you're going to cut it in half, and then just turn the avocado so that you're slicing the whole way around.  Twist each half apart and you'll be left with what you see in the photo above.  Then whack your knife into the pit and pull it out.  Next with your knife, slice three rows down and three rows across through the flesh on each half, and then grab the skin and essentially flip the avocado halves inside out.  The chunks you cut should easily come right out, and it'll save a lot of messing scooping.

In a medium bowl, combine your mashed avocado with all of the ingredients and stir to fully blend.  Adjust salt or lime juice, if necessary.  Serve immediately or really allow the flavors of meld and refrigerate for about 1 hour.  Serve it up the classic way with corn tortilla chips, use it as a topping for burgers and sandwiches, or see our favorite Potato Skins recipe and omit the traditional stuffings and throw in some guacamole or use it along with the bacon and cheese, for a fresh take on a game day classic!

Game on and gauc on!


Wednesday, January 22, 2014

Broccoli Pesto

I've got a fever, and the only cure is...MORE PESTO!  I've gotta have pesto, baby!  Ever since my Cilantro Pesto escapades, I've been obsessed with making it in just about any form I can.  We're talking, "I can't live if living is without you!!!!" levels of pesto obsession.  So last night, this past week's broccoli made its way into a new batch of pesto with delicious results.  You can't taste the broccoli in it, so this is an excellent way to sneak more veggies into your family's food without them having to actually eat the happy little trees.  This recipe makes a lot, and by a lot I mean after tossing about a cup of pesto with my pasta, I still have a full pint jar full of pesto.  Oh the possibilities!  Or maybe just hand me a spoon...

Broccoli Pesto


Ingredients:
1 cup roasted, unsalted almonds
2-3 cups basil leaves
1 cup olive oil, plus extra for drizzling
6-8 cloves garlic (depending on how much garlic punch you like)
4 Tbsp lemon juice
1 head of broccoli, florets trimmed and blanched
1/2 tsp Kosher salt
Pasta of your choice

In a pot bring water to boil and add broccoli florets.  Allow to blanch for 3 minutes or until broccoli is not longer bright green and has stopped floating on top.  Remove with a slotted spoon and place directly into a bowl of ice water to stop the cooking process.  Rinse out pot, and refill with water (or use same water if you don't mind an extra broccoli flavor to the pasta), bring to boil and add pasta to cook to package directions.

In a food processor, add your almonds, basil, olive oil, garlic and lemon. Blend until smooth.  Strain your broccoli out of the ice water and add to food processor.  Add salt and blend until fully smooth, taste and adjust any lemon juice, garlic or salt, as needed.

This makes A LOT of pesto, so half the recipe if you don't want the leftovers.  As you really only use about 1/2 cup to 1 cup of pesto to toss with your pasta.  Add a few more glugs of olive oil when tossing with pasta to keep everything from sticking, and adjust with a pinch or two of salt.

With the remaining pesto, keep in an air tight container and use instead of mayo on some BLT's, toss with some roasted potatoes and olive oil for a fragrant side dish, or use as an appetizer spread on crostini with cheese and meats.


Monday, January 13, 2014

Green Warrior Smoothie

You knew it had to happen.  All of those greens in this week's Crop Share, it was inevitable.  Yes, that's right, ANOTHER green smoothie!  I can't be stopped, I won't be stopped!

So, this morning I rose early to get back into the practice of yoga to start the day, and as I was holding Warrior III, instead of concentrating on my breathing or finding a focal point on my mat...I was thinking about what to put into my blender.  I'm very zen like that.  Thus the name for this smoothie, the Green Warrior, as it was devised whilst in Warrior III.

With the inclusion of celery in this smoothie it has much more of a "green" taste and there's more "substance."  So if you're not a fan of much pulp in your smoothie, just leave the celery out.  And if you're wanting to have less of a "green" flavor, then add more tangelo juice or even throw in a banana or a handful of strawberries.  Or again, just omit the celery.  I threw it in for giggles and I wanted it to actually taste more like veggies rather than a dessert.  Because I'm very into health like that.  Please ignore that wrapper from a completely eaten bar of chocolate.  Our invisible, imaginary bulldog, clearly got into the pantry again.  Darn pooch.


Green Warrior Smoothie


Ingredients:
12 ice cubes, divided
3 gala apples, cored and cubed (no need to peel)
Juice of 2 tangelos
1 rib of celery, ends trimmed and chopped
8 kale leaves, removed from stalks
Juice of 1 lime
1 1/2 cups unsweetened vanilla almond milk (I use Almond Breeze)

Into your blender, add 6 ice cubes, apples and tangelo juice, and blend until the apples are fully incorporated.  Toss in your celery and again blend until all chunks are gone.  Add kale leaves and lime juice and blend down until only flecks of green remain.  Then finish with almond milk and remaining 6 ice cubes.  Blend until ice is fully crushed.  Serve immediately.

Makes just shy of 3 pints (I serve mine in mason jars).  I drank one and bottled up the other two, so I'll let you know if after a day in the fridge, they're still good tomorrow.

Thursday, January 9, 2014

Rise & Shine Citrus Smoothie

And the smoothie train continues to chug along, and by chug, I mean guzzle at rates that would make a frat boy proud.  We're getting tangelos this week, and not only is it one of the funnest words to say, they are a pretty cool hybrid of tangerines and grapefruit (some are also tangerines combined with pomelos, hence the "elos" in tangelo).  Unlike grapefruit they're easy to peel, and they are power packed with juice.  So...GET IN MY SMOOTHIE!  This Rise & Shine Smoothie really is breakfast in a glass as  you get your fresh-squeezed citrus boost, a protein & calcium jolt from almond milk, and disregard what those silly internet ads say, the bananas in this will keep you feeling full without filling you out, and they are great for helping to balance out blood sugar levels.

Rise & Shine Citrus Smoothie


Ingredients:
16 ice cubes
2 bananas, peeled
Juice of 2 tangelos
Juice of 1 red grapefruit
1 cup unsweetened vanilla almond milk (I use Almond Breeze)


Into the blender all of your ingredients go, blend until the ice is fully crushed and prepare for morning magic.  It reminded me a bit of an Orange Julius, and then it also reminded me somewhat of a pina colada, so use some reduced fat coconut milk in place of the almond milk and really transport yourself to the tropics!


Monday, January 6, 2014

Green Refresh Smoothie

Anyone else feel like the spinach this week just won't quit?  I used about 3 cups in the Go Green Smoothie, then I tossed 2 handfuls into some Homemade Take-Away Beef With Broccoli, and some how I still had a good 3 cups left this morning for yet another smoothie.  Pretty sure my spinach keeps regenerating.

So this morning I wanted another green smoothie, yet something more refreshing than sweet.  So I grabbed the one pear and the one lemon I had left and thus, the Green Refresh Smoothie was born.  This is the perfect morning wake up, and it would be especially great after a morning workout to get you recharged and give you a nutrient boost.  Other than 1 cup of almond milk and 12 ice cubes, this smoothie is all produce.  And  if you like lemonade, then this one is sure to please!


Green Refresh Smoothie


Ingredients:

12 ice cubes, divided
1 banana, peeled
1 Bartlett pear, cored and cubed
1 cup unsweetened vanilla almond milk (I used Almond Breeze)
3 cups spinach, washed and stems trimmed
Juice of 1 lemon

In  your blender, add 6 ice cubes, the banana, pear and almond milk.  Blend until ice is fully crushed.  Then add your spinach, and you may need to add it in batches so you're not cramming the blender.  Once the spinach is fully blended, add in your lemon juice and final 6 ice cubes, and blend until the ice is completely crushed.

Serve immediately.  Makes about 2 mason jars (pint sized) full.


Monday, December 30, 2013

Italian Greens & Beans

Spending a week back in Youngstown and being in the off-season at Nalls means I've gotten to spend a lot of time back in the kitchen, and what is cooking in my kitchen has been LOTS of Italian food.  As I've said before, neither of us have a lick of Italian in us, but growing up where we did, you essentially become Mediterranean by association.  So one of my hometown favorites I got to eat over the holidays was Italian Greens & Beans.  And while I was eating it, an epiphany, a delicious epiphany...there's no reason I can't make this on my own, AND this would make a perfect Crop Share recipe for all the greens we get.  BINGO!  So over this dreary weekend, I whipped up a batch of this loveliness, and this will definitely be going into heavy rotation any time we get greens in the Crop Share.  Traditionally this is made with escarole, but any greens will do.  So if you're burnt out on Kale Chips or flummoxed by collards, this is an easy, quick, versatile, and nutrient packed dish that's sure to please!


Italian Greens & Beans


Ingredients:
3 Tbsp olive oil
1 Tbsp garlic, minced
1 sweet onion, diced
7 cups greens (I used a mix of spinach, baby chard and baby bok choy, but you can also use escarole, kale, collards, or Swiss chard, just remove larger leaves from the stems)
1/2 cup red wine (I used a pinot noir.  Avoid any sweet reds)
19 oz cannellini beans, rinsed well and drained
3/4 cup marinara sauce
Kosher salt & ground black pepper to taste
Dash or two of red pepper flakes, optional

In a large skillet, heat oil over high medium high heat.  Add in garlic and onion and saute until translucent.  Add in greens, and you may have to add them in batches to allow them to wilt down to make room for the rest.  Cook until greens are fully wilted.  Add in wine, and simmer for an additional minute or two.  Stir in beans and marinara, and then add your salt, pepper and red pepper flakes.  Stir to fully combine, reduce heat to low, cover, and simmer for 3-4 minutes.  Taste sauce and adjust seasoning if necessary.

This is great as a side dish, or toss it with some pasta for a vegetarian main dish.  Or throw in some chicken or shrimp for added protein.  We ate ours as a side, and then the leftovers got re-heated in a skillet with some leftover shrimp from shrimp cocktail, and then we tossed it with some gluten-free pasta.


Vegan Creamy Dill Dip

Rarely do I snack on chips (now chocolate chips, that's another story), and if they're at a party I tend to pass them by.  Unless...there's dip.  I could eat onion chip dip by the spoonful, right out of the container and only feel a twinge of shame.  Just a twinge.  So when I married the Mister and his dairy allergy, store bought chip dips were right out.  Ah, but I could still dip away at parties!  Until I had to go gluten free, and that glorious onion dip was now on the no list.  Really, gluten, you have no business in my chip dip!  So while we were back in Ohio over the holidays, I concocted this little number that was so addictive, my Mama, my Gram and I sat around eating it while everyone else ate their dessert on Christmas.  My recipe calls for the use of Tofutti Better Than Cream Cheese and Tofutti Sour Supreme (both can be found at the Giant), and while as a self-proclaimed connoisseur of all things sour cream and cream cheese I give these two thumbs up, if you prefer to not use the faux stuff, you can absolutely use regular cream cheese and sour cream.  Lighten it up with reduced fat sour cream and Neufchatel (a third less fat than regular cream cheese), just beware with the reduced fat sour cream you'll have more water content so you may need to add a little less sour cream to help maintain the dip consistency.

Vegan Creamy Dill Dip


Ingredients
16 oz Tofutti Better Than Cream Cheese
10 oz Tofutti Sour Supreme
2 tsp garlic, minced
1 bundle green onions, ends trimmed, and diced down to white part
3 Tbsp dill (fresh or dried, either will work)
pinch salt
1/8 tsp ground black pepper

In a medium sized bowl, whip together cream cheese and sour cream until smooth and creamy.  Fold in remaining ingredients and stir until fully combined.  Cover bowl with plastic wrap and place into fridge for at least 1 hour prior to serving to allow flavors to mingle and for dip to firm up.  Keep refrigerated until ready to serve.  Great to make a day in advance, as the longer this dip sits, the better it tastes.


Thursday, December 5, 2013

Getting 'Snippy: Baked Parsnip Fries

I'm slightly obsessed with French fries and turning random vegetables into types of fries.  So last year when I received parsnips for the very first time I thought...let's make this into a fry!  Best idea ever!  Parsnips are pretty interchangeable with potatoes, so they work incredibly well as fries, plus they have that little parsnip umph that gives it something a potato can't.  So if this is your first encounter with parsnips...put a fry on it!

Baked Parsnip Fries


Ingredients:
2-4 parsnips, peeled and cut into French fry pieces
3 Tbsp olive oil
Garlic powder, Kosher salt and ground black pepper, to taste (Sprinkle on about 1 Tbsp of fresh rosemary for a fragrant kick!)

Preheat oven to 450 degrees.  Toss parsnips in olive oil and sprinkle with seasonings to evenly coat.  Spread evenly onto a rimmed baking sheet and bake for about 10 minutes.  Turn parsnips to allow to brown on all sides and roast for an additional 10 minutes or until they look nice and golden brown.

Serve with a sriracha mayo dipping sauce (mayo, garlic powder and sriracha all mixed up to taste), or get your hands on some Black Truffle Salt from Spice & Tea Exchange in Old Town and combine that with some mayo, a titch of olive oil and rosemary for a sinfully decadent dip.


Maple Roasted Acorn Squash

When it comes to squash, The Mister is highly skeptical.  It's probably due to one memorable in a not-so-good-way faux alfredo sauce that used pureed squash rather than any cream or cheese.  In theory it should have been delicious, in reality the only way we could eat it was to slather it with hot sauce.  Yes, it was that gross.  So I've had to slowly win him back over to the world of squash.  And the one dish that finally did it was Maple Roasted Acorn Squash.  The sugar in the maple syrup and the natural sugars in the squash meld together and caramelize to essentially candy the squash, and it is DE-LISH!  You don't even need to skin the squash as it gets nice and soft.  I made this as a side dish to some baked chicken, and it was so good, I sliced up another acorn squash so we'd have plenty of leftovers!  So put down the pancakes and pick up the acorn squash, as maple syrup has a new BFF!

Maple Roasted Acorn Squash


Ingredients:
1 acorn squash, halved, seeds scooped out and sliced into 1/2" wedges
2 Tbsp olive oil
1/4 cup pure maple syrup
Pinch or two coarse ground black pepper

Preheat oven to 375 degrees.  Toss acorn squash in olive oil and maple syrup, spread evenly onto a rimmed baking sheet and sprinkle pepper evenly over top.  Roast for 20-30 minutes until squash is soft and is starting to turn golden brown.

Serve as a side dish to fish or poultry, or toss with a fresh kale salad (massage that kale!!) with a light vinaigrette and some pomegranate seeds.


Wednesday, November 13, 2013

Quinoa Tabbouleh

When your best friend is Lebanese and her mom owns her own restaurant, that can only mean one thing...you wind up with hummus running through your veins.  I cannot tell you the number of times I made the mistake of eating something before going to their house.  Big, big mistake!  Because you're almost always greeted with a giant plate of delights, and whether you came on an empty stomach or not, you will leave nearly unable to stand up straight from being so full.  So I've been trained to consume NFL linebacker portions of hummus, pita, tabbouleh, kibbe, fattoush, mujadara and shawarma.  Not to mention obscene quantities of garlic sauce that I will continue to sweat out for about 48 hrs (oh yes, I keep it classy!).  So when I had to give up gluten, there went pita, kibbe, fattoush, and tabbouleh, 4 of my favorite things on earth, right out the window.  Waaaaaaa!!!!  But, like the angle she is, Mrs. Rajeh started making gluten-free kibbe and tabbouleh at her restaurant, using quinoa as the base for both.  Happy days were here again!  So the last time my friend Nawal stayed with us, she arrived with a big container of me-safe tabbouleh from her mom's restaurant, which I promptly ate in one sitting.  Whether you enjoy this recipe gluten free with quinoa, or go the traditional route with bulgur/cracked wheat, it will undoubtedly have you singing....The Tabbouleh Song.  DC based comedian, Remy, put this together a few years ago and ever since I've been shake, shaking my booty every time I eat tabbouleh.  Because, as Remy says, you've got to push, push, push the tush, when you eat an Arab salad that's not fattoush!  Enjoy this taste of Samia's Phoenician Grill (well as close as it gets since, as a true cook, Mrs. Rajeh never measures or writes anything down).

Quinoa Tabbouleh


Ingredients:
1/2 cup quinoa (or bulgur for traditional, non-gluten free version), cooked to package directions
1 bundle fresh parsley, finely chopped
2 Tbsp (heaping) fresh mint, finely chopped
3 green onions, ends trimmed and finely diced
2 tomatoes, seeded and diced
1 tsp garlic, minced
Juice of 2 lemons
1/4 olive oil
Kosher or sea salt

Cook quinoa according to package directions, then set aside to cool completely.

In a bowl, mix together parsley, mint, onions, tomatoes and garlic.  Fold in cooled quinoa and stir to fully combine.

In a separate bowl whisk together lemon juice and olive oil.  Pour dressing over the tabbouleh and season with a pinch of two of coarse ground salt.

Cover and refrigerate for at least 30 minutes to allow flavors to meld together, and then taste and adjust any seasoning as needed.


Serve with Homemade Chicken Shawarma or Kale, Sweet Potato & Lamb Polenta Pizza, basically anything with super bold flavor that needs a good refreshing palate cleanser to go with it.


Sunday, November 10, 2013

Revamping Mon Mama's Stuffed Mushrooms

My mama likes to say I get my cooking skill from my Da because she believes herself to be a paltry cook.  Granted, being the crazy busy woman she is, time for cooking has always been thin on the ground for her, but come to one of her holiday dinners and prepare to feast like you've never feasted before.  There are so many of her dishes that are total comfort foods for me, like her chicken & noodles, beef stroganoff, Thanksgiving stuffing, and of course, her stuffed mushrooms.  Now there's one sad, frustrating ingredient binding all of those dishes together...gluten.  So if I am going to enjoy these favorites of my childhood, I have to stop pouting, gird my gluten-hating loins, and make them in a way that's safe for me.  The noodles and stroganoff were easy, the stuffing I haven't had the heart to try, but those stuffed mushrooms have been calling to me.  Namely because the cremini mushrooms from the final week of the Fall round were eyeing me longingly every time I opened the fridge.  So I called up my mama to get the run down of her recipe and set to work in hopes of contriving something that would generally taste like her version.  While the texture was a tad different and being the nice wife I am I used the Mister's dairy-free cheese so I could share them with him, they turned out nearly identical to her's!!!!  Squee!!!!  So with the holidays coming up, these are a perfect appetizer to quickly whip up, and I'll provide the me version and mon mama's version so you can make them either way you wish.  Oh and to truly enjoy these, you really should pour yourself a glass of wine.  Cheers mama!

Mon Mama's Stuffed Mushrooms


Ingredients:
1 doz cremini mushrooms, stems removed and reserved
1/2 cup of breadcrumbs (make your own with the Petite Loaves in this week's share, or make them gluten free with Glutino bread crumbs -- also dairy & egg free)
1 Tbsp garlic, minced
1 tsp soy sauce (Kikkoman has a great gluten-free variety)
3 Tbsp butter, melted (use Earth Balance margarine for dairy free)
1/4 cup jack cheese (I used Daiya mozzarella shreds, which are a dairy free product that's also soy free)
1/4 cup dry red or white wine
Ground black pepper

Preheat oven to 350 degrees.

Gently wash your mushrooms by rinsing under water and lightly rubbing your fingers over them to remove the dirt.  Don't scrub them as you'll actually lose some of the wonderful earthy, mushroom flavor.  Pop the stems out and allow the caps to dry on a paper towel.  Trim the soil end of the stems and then dice the reserved stems for use in the stuffing.

In a bowl mix together the diced stems, breadcrumbs, garlic, soy sauce, cheese, wine, and half of the melted butter.  Mix well to combine and then season with ground black pepper to taste.

Place mushroom caps on a baking sheet and drizzle the remaining butter over top and around the mushrooms to prevent them from drying out.  Then stuff each cap generously with the stuffing.  I had a good bit of stuffing left over, so I rolled it up into 4 stuffing balls that I placed on the baking sheet too (they turned out tasting a lot like arancini -- fried rice balls).  Bake for 10 minutes at 350.  Then turn broiler onto high and move mushrooms to the top rack of the oven.  Broil for 3-5 minutes or until slightly browned and you can see the stuffing start to bubble and pulsate.  Keep an eye on them in the broiler as they can go from fine to smoking very quickly.

Transfer to a plate to cool slightly and enjoy with some wine...and maybe a call home to your mama.


Move over kale...Collard Chips are here!

So when customers ask us what to do with collards, we love to tell them it's easily interchangeable with kale in recipes.  Being higher in calcium and lower in calories (okay it's a veg, let's not get too concerned over the caloric intake), collards make a great swap for kale.  Plus, collards aren't vogue right now, so that means they're much more affordable.  And then as I was telling all of this to a group for a Juicing With Greens workshop, it came to me...Collard Chips.  In theory, I figured it should work, but I was totally not prepared for how delicious the results would turn out to be.  Not only do they taste just like kale chips, but they are sturdier so they can actually be dipped in things...albeit delicately dipped.  Which was perfect because I had a ton of Radish Dip left over.  Veggies, on veggies, on veggies!  So if you're still staring down that massive bundle of collards from the last week of the Fall round, turn them into a crunchy evening stack!


Collard Chips


Ingredients:
1 Tbsp olive or coconut oil
1 bundle collards, rough chopped and stems removed
Kosher or sea salt

Preheat oven to 300 degrees.

On a baking sheet, toss collards in oil and sprinkle with salt.  Bake in the oven at 300 degrees for about 10 to 15 minutes.  Mine baked up really quick, so start checking them at 10 minutes and add cook time if they're not crisped up yet.


Serve with Radish Dip for a veggietacular snack!


Thursday, October 31, 2013

Stewed Collard Greens, Kenyan Style: Sukuma Wiki

A few weeks ago I mentioned in the Crop Share spoiler e-mail that I'd be posting my results of a big Kenyan feast I was cooking up, as that was how I planned to use up the last of that delicious sweet corn.  I did make the feast, but I'm just now getting around to the blogging part.  Ah well, I run on Irish time!

Wait, so what's this Youngstown born, Irish American gal doing making a Kenyan feast and getting all misty eyed over the dishes?  Isn't Kenyan cuisine thin on the ground in NE Ohio and in Ireland?  It is, but I was blessed to be able to fall in love with these flavors in Nairobi, Kenya.  To make a very long, and very awesome story short...there was a man from Nairobi named Mo Amin, who was one of the most influential photojournalists of the 70s, 80s and early 90s (remember the NBC Nightly News segment in 1984 on the Ethiopian famine that spawned USA For Africa, We Are The World, Live Aid and Band Aid -- that was Mo's footage).  There was another man named John from Youngstown, OH, who was one of the pioneers in upper limb prosthetic technology.  John also had a curious, adventurous, ginger-haired little girl named Tara.  The three of them met due to an ammunitions depot explosion and a stray missile in Ethiopia.  Thanks to John's expertise, Mo was able to go back to work doing what he did best, and thanks to Mo, John and his family had their lives changed forever, especially little Tara.  Finally in 1995, they got to visit Mo in Nairobi and thus 13 year old Tara's love affair with the flavors of Kenya was born.

There is way more awesomeness to the story, and even more tears because in '96 I lost my friend and mentor when the Ethiopian Airways flight he was on was hijacked and crashed off the Seychelles.  Maybe it's solely due to Mo, but despite only spending about a month in Kenya, it has remained a place I will get legitimately homesick for.  But there is something magical about that country, and while Mo was hands down the most incredible person I've ever met, I know he's not the sole reason why there are times my heart just aches to be back there.  And until I finally sat down to do some serious research on some of my most beloved dishes from my time there, my stomach has been aching for nearly 20 years for those foods!  But oh thanks to the magic of some collards, white corn meal, corn, beans, and then a delicious curried beef stew, I got to transport myself and the Mister to Kenya for an evening.  And yes, I cried with the very first bite.  I'm a total foodie sap.

So since collards have made their way into this week's Crop Share, I give you two of my favorite dishes...sukuma wiki and ugali.  There's a reason why "sukuma wiki" is Swahili for "stretch the week" because you will have a mountain of greens...dare I say a Mount Kilimanjaro of greens!

Stewed Collard Greens, Kenyan Style: Sukuma Wiki


Ingredients:
3 Tbsp olive oil
1 sweet onion, chopped
1 bundle collard greens, rough chopped
2 cups diced tomatoes
1-2 cups water, chicken or vegetable stock
Salt & pepper to taste


Heat oil over medium high heat in a large saute pan.  Add in onions and saute until translucent.  Toss in greens, and you'll likely  have to do this in stages to allow them to wilt down and make room for the rest.  Once greens have wilted down to make enough room, stir in tomatoes and cook for an additional 2-3 minutes.  Add in water or stock, and simmer on low for about an hour.  Season with salt & pepper to taste before serving.

To really keep it traditional, serve with ugali (big ball of awesome in the center of the photo below).


The ugali, which is just cooked white corn meal, is the vehicle you use to sop up and scoop up all the loveliness on your plate.  Just bring 4 cups of water and 2 teaspoons of salt to a boil, then stir in 2 cups of finely ground white corn meal (if you have trouble finding it, check the Hispanic food section of your grocery or head to a Hispanic market, as white while corn meal/masa for arepas is exactly what you'll need).  Reduce heat right away lest you want to be pelted with bubbling corn meal.  Then stir off and on for about 10 minutes until the ugali pulls from the sides of the pan and begins to form a ball in the pan.  You'll think its done much earlier, but trust me, you need 10 minutes, as you want to get a bit of a crisp on the outside. Not a burn, just a light crisp.  Remove from heat and allow to slightly cool.  Then wet your hands with water, pull out a hunk of the ugali and roll into a ball the size of your palm to place on each dish.  It actually does reheat well, so if you're only cooking for 1 or 2, you'll be able to stash the rest away and eat it as you go through the week.


Friday, October 25, 2013

Laying Down Some Rad...ish Beets!

This week we're hitting you with beets and radishes.  Okay, we're not literally going to hit you with them, but for those of you who are cringing over either or both of these veggies, you may be feeling like this is a human rights violation.  Thankfully, they are much more versatile than things that get sliced and placed on a sad, side salad.


So here are two sweet treat takes on radishes and beets, one a healthy and detoxifying smoothie, and the other...cupcakes, awesome Red Velvet cupcakes with cream cheese frosting.  Because everything is better with cream cheese frosting.  And the cupcakes are vegan, so really they're practically a health food.


Rawkin Radish Smoothie via Young and Raw


Natural Red Velvet Cupcakes Made With Beets via Je Suis Alimentageuse


Tuesday, October 1, 2013

Adventures in Cauliflower: Curried Cauliflower & Chickpea Bake

I've said it before and I'll say it again, I loathe cauliflower.  LOATHE IT!!!!  I'm stunned by the number of people who are just utterly bewildered by my hatred of this vegetable that looks like a nuclear bomb explosion, to me that was nature's way of saying, "Do not eat this, it will literally melt your very soul."  Most people I know actually like it, in fact they love it.  Since I'm willing to admit that the rest of the world may not be completely out of it's collective mind (though I'm still skeptical), I decided to make this the week I give cauliflower a second and possibly even a third chance.  I asked Crop Share members to send their cauliflower recipes my way, and wouldn't you know I only heard from two members, and both of them said they too disliked cauliflower!  There ARE more like me, I knew it!  And funny how all these cauliflower lovers didn't flood my e-mail with their recipes, hmmm.  I call shenanigans!  But I had made a pledge, so I chose a few of their recipes to test out and tonight began my first step in this week's Adventures in Cauliflower.

The minute I pulled that cauliflower out of the fridge, I turned into Grumpy Cat.

Caulifl....no.


The sight, the smell, the texture, the whole thing just creeped me out, and I'm pretty sure I chopped that head of cauliflower with a Grumpy Cat expression plastered to my face.  Bleh.

But I pushed on and tonight's Adventures in Cauliflower was to make a Curried Cauliflower & Chickpea Bake that was shared with me by Crop Share member Liz Candelario.  I love curry and am pretty sure I could eat anything if it had curry on it, so this HAS to work, no?!  Here's the recipe and then scroll all the way to the bottom for my reaction...

Curried Cauliflower & Chickpea Bake


Ingredients:

1 Tbsp olive oil
1 Tbsp garlic, minced
1/2 sweet onion, chopped
1 can (14.5 oz) fire roasted tomatoes (I use Muir Glen)
1 1/2 Tbsp curry powder
1 can (15.5 oz) chickpeas, rinsed and drained
1 head cauliflower, chopped

Preheat oven to 375 degrees.

In a skillet heat olive oil over medium high heat.  Saute garlic and onion until onion begins to just slightly brown on the edges, taking care not to burn your garlic.  Stir in fire roasted tomatoes and curry powder and simmer for an additional minute.

Spread cauliflower and chickpeas evenly in the bottom of a baking dish and toss with just a bit of olive oil to prevent anything sticking to the bottom of the dish.  Pour curried tomato mixture over top and toss to full combine.

Bake for 40 minutes at 375, stirring about twice during the baking time.


My reaction...


Like Ron Swanson's feelings about all vegetables, I am still wildly unconvinced of the merits of cauliflower.  I was able to eat a small portion, and everything BUT the cauliflower was absolutely delicious.  Still not a fan of cauliflower, so maybe the next test recipe will do the trick.

Bleh, where's the mouthwash?


Mushroom Stroganoff for World Vegetarian Day!

Happy World Vegetarian Day!  Whether you eat meat or not, I think we can all agree that more fruits and veggies are a good thing...a yummy good thing.  I was a vegetarian for most of my life, but let's be honest, I'm too much of a foodie to restrict myself (I'm looking at you delicious, delicious bacon jam!), especially when so many items are already off the table due to the Mister's and my food allergies.  But for the most part we practice Meatless Mondays in our home, and we would really be up a creek if it weren't for all those crafty vegan cooks, like Doron Petersan of Sticky Fingers Sweets & Eats,  who come up with new and interesting ways to make desserts we can safely eat.  So on this World Vegetarian Day, I give you a way to use up the mushrooms and most of that lone onion from this week's Crop Share...my version of Skinnytaste's Mushroom Stroganoff!


Mushroom Stroganoff


Ingredients:

1 Tbsp butter (I used Earth Balance Margarine for dairy-free)
1/2 sweet onion, chopped
2 Tbsp corn starch
2 cups reduced sodium vegetable broth
1 Tbsp plus 2 tsp soy sauce (I use Kikkoman's gluten-free soy, but you can also use 1 Tbsp only of Worcestershire sauce.  My Mama always used soy sauce in her stroganoff, so that's why I went that route)
1 tsp tomato paste
1 tsp Dijon mustard
1 pint mushrooms, gently washed, stems trimmed and sliced
1/4 tsp thyme
Ground black pepper to taste
2 Tbsp dry white wine
1/4 cup sour cream or plain Greek yogurt (I used Tofutti's Sour Supreme for dairy-free)
8 oz uncooked noodles (I use Schar's tagliatelle as it's gluten and egg-free, and you won't even know!)


Begin to bring your pasta water to a boil so that you can cook your noodles while you prepare the sauce.  If you want to mix your noodles into the stroganoff, then undercook them to allow them to finish in the sauce.  I prefer a larger noodle to sauce ratio, so I fully cooked the noodles and then spooned the amount of sauce I wanted on my portion.

In a skillet, melt your butter over medium high heat until it's bubbly.  Add in you onion and saute for about 3-4 minutes, until onions are translucent.  Stir in your corn starch and fully coat all the onions, allowing to cook for an addition 30 seconds.  Slowly add your vegetable broth, scraping up any browned bits from the bottom of the pan.  Add in soy sauce and tomato paste, making sure to fully mix in the tomato paste.  Bring up to a simmer and add your mushrooms, thyme and ground black pepper.  Simmer for about 4 minutes or until sauce has thickened up.  Stir in your white wine (and here would be where I had an oops, I thought 2 CUPS of wine -- wishful thinking -- so thankfully I only had a 1/2 cup at my disposal and caught myself before I added more, so if you'd like a more "winey" sauce, then add a half cup of white wine and then an addition 2 tsp of soy sauce) and bring sauce to a low simmer.

Once noodles are cooked either drain and mix in to the sauce, or set aside and toss with a splash of olive oil to keep them from sticking.

Before serving, stir sour cream into the sauce and leave on heat for an additional minute to bring it all up to the same temperature.


**You'll be easily able to convert this into a beef stroganoff by starting with 1 lb of beef round or chuck cut into 2 " cubes (my Mama always asked the butcher to run them through the meat tenderizer to make the pieces melt in your mouth even more) and brown that up in butter or olive oil before removing and adding in the onions and mushrooms to brown up.  Then add the beef back in, stir in your corn starch and add your liquid to loosen all the lovely browned bits from the bottom of the pan.  Proceed from there and simmer everything for about 30 minutes before stirring in the sour cream.**


Friday, September 13, 2013

Zucchini Ribbons in Oil & Garlic via Natasha Scott

Crop Share member Natasha Scott (not a Scott for long as I hear it's the 30 day countdown till her wedding, yay mawage!) can always be counted on coming up with super healthy takes on traditional recipes.  Her own blog Tash's Noshes has lots of great recipes, and they often contain Crop Share veggies and fruits.  Recently she got a spiral cutter and thus zucchini pasta was born.  This recipe hasn't made it to her blog yet, so I picked her brain for the yummy recipe to share with you all.  While a spiral cutter makes this a cinch, you can also use a potato peeler to achieve some of the same effect.  In the recipe below she just did a simple light oil and garlic preparation, but this would be fantastic with some pieces of grilled or sauteed chicken, or even try tossing with some marinara to see who all you can fool that they're eating pasta made from veggies!

Zucchini Ribbons in Oil & Garlic


Ingredients:
4 zucchini, sliced with a spiral slicer or a potato peeler
1-2 tsp olive oil
2 tsp garlic, minced
coarse ground salt & cracked black pepper to taste

Heat olive oil in pan over medium high heat, add in zucchini and garlic, and saute for 3-5 minutes, until zucchini is cooked through but still retains some crunch.  Season with salt and pepper to taste and serve immediately as a side dish or as it own pasta dish.