Friday, September 27, 2013

Can't Wait To Try!

With tomorrow's opening of our Pumpkin Tunnel we had a late, after-hours staff meeting, which means I fell asleep while writing the previous post.  So if things cease to make sense, that's why.  To keep things short and sweet and get sleepy self to bed, here are two recipes I'm dying to give a try this coming week!  Yum and zzzzzzzzzzzzzzzzzzzzzzzzzzzzz...

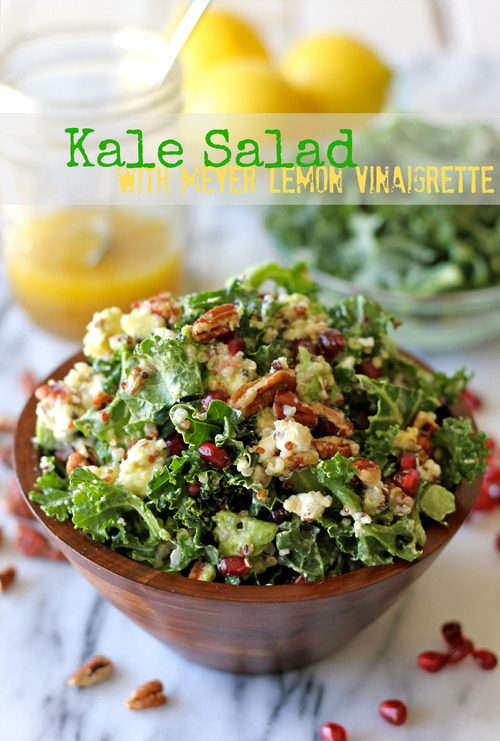
Kale Salad with Meyer Lemon Vinaigrette via Damn Delicious


Kale, avocado, goat cheese, quinoa and pecans?!  It's like all my loves in one bowl!


Mushroom Stroganoff via Skinnytaste


Love stroganoff.  Love mushrooms.  This recipe cannot disappoint!  Prepare to be made dairy & gluten free you crazy Skinny Mushroom Stroganoff you!


Thursday, September 26, 2013

Kale, Sweet Potato & Lamb Polenta Pizza

Polenta-crust pizza is kind of my jam these days.  I just buy pre-made polenta, smush it into submission onto a baking pan or pizza stone so it's thin enough and pizza-shaped, and then par-bake it for about 5 minutes before adding the toppings so I can get it to start crisping up.  Last year when I discovered the joy of polenta crust pizza, I used up some kale to make this kale, sweet potato and lamb pizza.  And yes, that is a Darth Vadar spatula in the photo, and yes it was an item purchased off of our wedding registry.  Along with a Storm Trooper spatula, the non-digitally remastered original trilogy (because Han shot first), and a Death Star cookie jar.  Now that I've flashed my nerd card, enjoy this delicious and wonderfully fragrant pizza!

Kale, Sweet Potato & Lamb Polenta Crust Pizza


Ingredients:
1/2 lb ground lamb
Olive oil
1 tsp garlic powder
1/2 sweet onion, chopped
2 cups kale, chopped
Salt & Pepper
1 sweet potato, thinly sliced into chips
1 package of prepared polenta (or use any pre-made pizza crust, make your own or even try this recipe with Cauliflower Crust Pizza)
1/2 cup marinara sauce (I use Nature's Promise Organic Tomato Basil Sauce)


Preheat your oven to 400 degrees.

If using polenta for your pizza crust, mash it, roll it and generally strong arm it onto a baking sheet in the shape of a pizza.  Partially bake at 400 for about 5 minutes.

Once oven is heated to 400, toss sweet potato chips in a bit of olive oil and evenly arrange on another baking sheet and bake for about 15 minutes until chips start to crisp up.

In a skillet, heat 1 Tbsp olive oil over medium high heat.  Add in lamb and season with garlic powder.  Break apart into ground bits and cook until lamb is browned and fully cooked, about 5-8 minutes.  Remove from skillet and transfer to a plate lined with a paper towel to help absorb any excess grease.

In the same skillet add in onion and kale, and add in additional olive oil if needed.  Season with salt & pepper and cook until kale is wilted and onion has begun to caramelize.

Spread a thin layer of marinara onto your pizza crust, then top with lamb, kale, onions and sweet potato.  Add a bit of mozzarella, Parmesan or even goat cheese, if you desire, and then place back into a 400 degree oven for about 5-10 minutes.

Tuesday, September 24, 2013

Homemade Take-Away: Beef with Broccoli

Having a gluten-allergy means that most take-away is off the table for me.  It's a good thing I love to cook, and I'm sure in the long run my waistline and my heart will thank me, but sometime you just want to pick up the phone and order pizza or Chinese without a care in the world.  Thankfully Moo Goo Gai Pan was always my favorite Chinese take-away dish and is the one dish that is actually safe for me.  But man a good Beef with Broccoli, or beef in any of that wonderful sweet, salty, yet mildly spicy brown sauce is sooooo yummy, and sooooooo off limits for me.

But, the day that local snow peas arrived in the store, Valerie began to celebrate in the office because that meant she was making The Pioneer Woman's Beef with Snow Peas and thanks to gluten-free soy sauce this recipe would be within my reach.  So I too grabbed snow peas the the rest of my supplies, tweaked the recipe a bit (I just can't leave any recipe well enough alone), and that night I treated the Mister and myself to homemade Chinese take-away.  It was BETTER than take-away, and I wanted to eat it ALL!  Oh Ree Drummond, you are a ginger angel of food loveliness (which by the way, leave it to a fellow ginger to come up with a recipe that relies on lots of lovely fresh ginger, oh how you rock woman)!  So this meant when broccoli made its way into last week's share, I knew what had to be done...sub out the snow peas and throw in that broccoli!  Let's just say I ate leftovers for breakfast this morning.  Go ahead and judge, I care not!  

So give your favorite Chinese restaurant delivery guy a break tonight, and make your own Beef with Broccoli at home.  I recommend prepping all your ingredients first, as once you start, this recipe goes super fast.  So I always make the sauce, get the meat in it to marinade, and then get my rice started so that's cooking away when I start to cook the veggies.  The sauce for this recipe is a great base, so feel free to sub in lots of different veggies.  I always throw in mushrooms, but think this would be great with sliced carrots, asparagus, water chestnuts, bamboo shoots, cabbage, and eggplant.  You can even leave out the meat and make a hearty vegetarian version with lots of veggies.

Homemade Take-Away: Beef with Broccoli 


Ingredients:

1 lb sirloin, flank steak or thin sliced top round
1/2 cup low-sodium soy sauce (use gluten-free soy or tamari to keep it wheat-free)
2 Tbsp sherry vinegar
2 Tbsp local honey
2 Tbsp brown sugar
2 Tbsp corn starch
1 Tbsp heaping, minced ginger
1 tsp heaping minced garlic
Dash of crushed red pepper (optional)
1 head of broccoli, chopped
1/2 lb mushrooms, gently washed & sliced
2 Tbsp scallions, chopped
3 Tbsp olive oil
2 tsp sesame seeds
4 cups cooked jasmine rice

In a bowl, mix together soy sauce through red pepper, making sure there are no cornstarch lumps left, and set aside.

Cut beef into thin strips and add to bowl with sauce.  Allow meat to marinade while you get your rice on to cook, as from here, it's going to go pretty fast.

In a large skillet or wok add oil and heat over high heat.  Not medium high heat, but face melting high heat.  So wear an apron or a riot shield if you're worried about oil splatters on your clothes.

Once oil is nice and hot, carefully add broccoli and mushrooms and cook for about a minute to a minute and a half, stirring continually to prevent any burns.  Once mushrooms have started to brown, transfer veggies to a separate plate.

Using tongs, carefully add in beef and if your skillet isn't large enough, you'll want to add it in stages.  Cook meat for 45 seconds.  Toss in scallions and give everything a quick stir.  Pour in rest of sauce and add back in veggies.  Cook for an additional 30 seconds at most, until sauce has started bubbling.  Remove from heat to prevent beef from over cooking and becoming chewy.  Stir in sesame seeds for an added garnish and serve over jasmine rice.  Should make enough for 4 generous portions.


Stuffed Cubanelle Peppers

With the Autumn chill in the air over the weekend, there was just one thing, but one thing to do with those Cubanelle peppers from last week's share...stuff them.  My Mama's stuffed peppers are one of my all-time favorite comfort foods, which is odd because until  I was in high school I hated the taste of the cooked pepper, so she always made some sans pepper so I could have a meatball and sauce.  Which means today I'm completely incapable of making a small batch of stuffed peppers without having also enough meatballs to feed about 3-4 other people.  Come to my apartment, I'll be like the old lady from the Wedding Singer just doling out meatballs into your hands!  And since Cubanelle's are much smaller than bell peppers, that means less filling and thus...more meatballs.  So if you follow this recipe to the letter, you will have PLENTY of meatballs and sauce left over for spaghetti and meatballs or for some great game day meatball subs.  And with the way the Skins have been playing...all you fans are going to need some hearty comfort food.  Oh snap!  ;)


Stuffed Cubanelle Peppers


Ingredients:
7 Cubanelle peppers, washed, tops and seeds removed
1 Tbsp olive oil
1/2 cup red wine (I used a Malbec & Cabernet red blend)

For stuffing/meatballs:
1 lb hot turkey sausage
1 lb ground turkey
1 cup dry bread crumbs (for gluten-free I used Glutino breadcrumbs which are also dairy-free!)
2 tsp garlic powder
2 tsp parsley (if you still have fresh or frozen herbs, I recommend using those for the herbs in this recipe)
1 Tbsp oregano
1 Tbsp basil
1/2 tsp Kosher salt
1 tsp minced garlic
1/2 tsp black pepper
1/4 cup applesauce (I used the last of my Homemade Applesauce)

For sauce:
60 oz tomato sauce (I use Nature's Promise Organic from Giant)
12 oz tomato paste (also Nature's Promise Organic)
2 tsp garlic powder
2 tsp parsley
1 Tbsp oregano
1 Tbsp basil
1/8 tsp red pepper flakes
1 tsp sugar

Preheat oven to 400 degrees.

In a sauce pot, mix all ingredients for sauce until fully blended, and bring to a simmer.  Depending on the tomato sauce and paste base that you use, you may wish to use more or less sugar depending on how acidic and bitter it tastes.  Cover pot to prevent sauce spurting everywhere, and simmer on low heat.

In a large bowl, mix together all ingredients for the meatball mixture until all ingredients are completely combined.  The applesauce in this recipe is used in place of an egg for binding, so if you don't have applesauce on hand you can always use 1 egg.

Stuff each Cubanelle with meat mixture until coming out the end and a bit mounded.  Place into a baking dish and repeat with all peppers, making sure to form a single layer of stuffed peppers.  Pour some of the sauce over top until all the peppers are covered, and then place dish into the oven to bake at 400 degrees for about 50 minutes.

Meanwhile, turn the rest of the meat mixture into meatballs that are no bigger than the palm of your hand.  I was able to get 8 additional meatballs out of my reserve mixture.

In a skillet, heat olive oil over high heat.  One oil is hot, begin to add meatballs to skillet, making sure not to overcrowd  your pan.  Brown all meatballs on all sides to form a bit of a crust, and then transfer them to the sauce pot to finish cooking in the remaining sauce.  Stir in red wine to sauce and simmer meatballs in sauce for at least 30 minutes on medium-low heat, until meatballs are fully cooked.

To reserve for future use, I like to freeze the meatballs right in the sauce in a freezer-safe container, that way they are ready to thaw and heat to spoon over spaghetti or to use for meatball subs.  Even just the meatballs and sauce make a great dinner.  Serve with a big salad to help offset the heaviness.


Thursday, September 19, 2013

Throwback Thursday: A (Short) Trek Down Crop Share Memory Lane

So I've apparently contracted some sort of plague, and while I've attempted to kill the germs with fire (inhuman amounts of garlic sauce from Baytna Mediterranean Kitchen in the Landsdowne Plaza and troughs of green tea), I still feel like someone hit me with a bus and then backed over me for good measure.  Thus, the new posts will be few and far between tonight.  Instead here's a smattering of past recipes centered around this week's items, and once I'm feeling less plague-like, gird your loins -- your sirloins that is -- for a homemade version of a Chinese take-away classic, Beef with Broccoli.  But until then, between sips of tea, I give you some past recipes...

Lentil & Potato Soup


Spaghetti with Broccoli, Sausage & Hot Peppers


Sausage, Potato & Kale Soup


Chipotle & Herb Roasted Sweet Potatoes


Eggplant & Pepper Curry


Leek & Potato Soup


Sausage & Apple Acorn Squash via Crop Share Member Kat

Last week Crop Share member Kat commented on one of our posts on Facebook saying that she was going to take the acorn squash and stuff it with apples and sausage.  Um...YUM!  So we asked her to send her delicious-sounding recipe our way, and here it is for all of us to enjoy, Sausage & Apple Acorn Squash.  I love that she recommends using pastured pork, meaning free range, happy, roaming about pork.  Happy pork makes yummy pork!

Sausage & Apple Acorn Squash via Kat


Ingredients:
1 acorn squash (sliced in half and seeds removed)
1/2 lb Pastured pork (I recommend Mt. Vernon Grassfed Farm, Smith Meadows Farm or Fields of Athenry)
2 apples (chopped into small pieces)
1/2 red onion (chopped into small pieces)

Preheat oven to 400 degrees.  Cover squash halves with foil and bake at 400 for about 1 hour.  Each half will be a bowl.

Brown sausage in skillet, remove meat to drain off fat.

Add the sausage back into the skillet and mix with the apples and onions.

Spoon mixture into the baked acorn squash bowls.

Top with Parmesan or Romano cheese, if desired.


Wednesday, September 18, 2013

Chocolate Chip Zucchini Brownies

Okay so we gave you A LOT of zucchini this week.  So if you're still left with zucchini and no inspiration, or maybe you just really don't like zucchini, then the best way to use it up is to hide it inside dessert.  Eww, you say?  Trust me, just like with zucchini bread, the zucchini is in there but you'll never know, plus it makes your baked good super, duper...well, you know, that m-word.  We all have a word in the English language that we despise, mind is that m-word often used to describe soft and luxurious baked goods.  I refuse even to type it, and I generally do not allow that word spoken around me.  But suffice it to say, if you add grated zucchini to a baked good, it will give you that oft desired texture that is better just enjoyed rather than named.

Anywho, m-word rant aside, I stumbled across this recipe for Chocolate Chip Zucchini Brownies from Texanerin Baking, and decided to tweak it to make it safe for consumption in this household.  Plus, I had just enough Homemade Applesauce left over to use in the recipe.  Score!  Now don't I feel all domestic!  So I've provided my gluten, dairy & egg free version below (I'd say this recipe was vegan if there wasn't honey in my homemade applesauce), with alterations for a gluten, dairy and egg full version.  Make it my way and this is practically a health-food!  Because anything with a cup and a half of chocolate chips in it is clearly good for you!  ;)

Chocolate Chip Zucchini Brownies


Ingredients:
2 egg equivalent of Ener-G Egg Replacer (or 2 eggs)

1 1/2 Tbsp vanilla

1/4 cup plus 4 Tbsp Homemade Applesauce

1 cup sugar (if not making the gluten-free version, you can stick to 3/4 cup, as the base flavor of the gluten-free flour pretty much tastes like aluminum so I try to mask it as much as possible)

1 cup Bob's Red Mill All-Purpose Baking Flour (or 1 cup regular All-Purpose Flour)

1/2 cup cocoa powder

1 1/2 tsp baking soda (or if you're like me, you forget you've run out of baking soda and have to substitute 6 tsp of baking powder -- if you do this, just use 1/8 tsp of salt rather than the full 1/4 tsp)

1/4 tsp Kosher salt

4 small zucchini peeled and finely grated (makes just shy of 2 cups)

1 cup Ghirardelli Semi-Sweet Chocolate Chips, plus 1/2 cup more for sprinkling (if not avoiding dairy, you can use any chocolate chips you desire)


Preheat oven to 350 degrees F.

Grease a 9 x 13 or 8 x 8 baking pan.

In a medium sized bowl, mix together egg replacer, vanilla, applesauce and sugar until well blended.  Allow to sit for several minutes to allow the sugar to mostly dissolve.

In a separate, larger bowl, mix your dry ingredients up through the salt, making sure to break up any clumps.  Stir in wet ingredients and mix until fully combined.  Fold in your zucchini and chocolate chips, and then pour into your prepared baking dish.  Sprinkle remaining 1/2 cup of chocolate chips over top.

Bake at 350 for 30-35 minutes or until a toothpick inserted in the middle comes out clean...well, as clean as it can be with all those chocolate chips.  You just don't want to see batter being pulled up, if so leave it in for a few extra minutes.

Allow to cool completely before slicing (yeah right, I don't even follow my own directions) and enjoy part of your daily serving of fruit & vegetables!


Sunday, September 15, 2013

Turkey Tenderloins in an Apple Cider Cream Sauce

I'm pretty sure my apartment became the Iron Chef Kitchen Stadium this weekend, and the secret ingredient was definitely anything and everything apples.  We already had a gallon of the apple cider in our fridge, so I decided I wanted to use the little quart from Crop Share to cook with.  I mused over a few recipes, but my mind kept coming back to pork tenderloins.  And thus I devised to make an apple cider cream sauce (dairy-free, of course, for allergy sake) with hints of rosemary and Dijon mustard.  I make a killer honey, tarragon and course ground mustard cream sauce for pork and turkey tenderloins, so I knew this was going to be a knockout sauce.  And then when I was browsing the pork tenderloins at the market, I kept seeing Penny Pig nuzzle my legs like she does when she wants me to give her a treat.  ACK!  The pig's gotten to me!  So I walked straight to the turkey section and got some lovely packages of sliced turkey tenderloins.  Both are really interchangeable flavor-wise, so you can use either pork or turkey tenderloins in this recipe, and I bet they'd even be delicious with pork chops.  Serve with some roasted asparagus and herb roasted baby potatoes for a wonderfully rustic Fall dinner.

Turkey Tenderloins in an Apple Cider Cream Sauce


Ingredients:

8 turkey tenderloins (would work great with pork tenderloins or pork chops, as well)
Kosher salt and cracked black pepper
1 Tbsp extra virgin olive oil
2 cups apple cider
1 1/2 cups heavy cream (for dairy-free, I used just shy of 2 cups of unsweetened rice milk blended with 2 Tbsp of melted Earth Balance margarine.  You may need to whisk in some corn starch blended with equal parts butter -- to prevent clumping -- in order to thicken the sauce a bit.  But you can also use unsweetened Silk soy creamer as that will be nice and thick-- alas, the store was all out of it.)
1 Tbsp dried rosemary (I ground it up in my mortar & pestle)
3 Tbsp Dijon mustard

In a heavy bottom skillet, heat olive oil over medium-high heat.  Season tenderloins on both sides with Kosher salt and cracked black pepper.  One oil is hot, add tenderloins to skillet, spacing evenly and making sure not to overcrowd the pan.  You'll likely have to brown them in shifts.  Brown on both sides about 2-3 minutes per side, and then transfer to a plate.  Repeat with all tenderloins and then tent the resting plate with foil.

Deglze the pan with the apple cider, stirring to remove all the browned bits off the bottom.  Whisk in your cream (or "cream concoction"), rosemary and Dijon mustard until fully blended.  Bring to a simmer, reduce heat and allow to simmer until sauce is reduced by half, about 4-5 minutes.  Return tenderloins to the skillet, adding any juices from the plate, cover the skillet and allow tenderloins to finish cooking in the sauce, about an additional 5-6 minutes until all tenderloins are cooked through.

Transfer tenderloins to a clean platter for serving and drizzle some of the sauce over top.  Place remainder of the sauce in a gravy boat for serving.


Saturday, September 14, 2013

Gettin' All Domestic: Homemade Cinnamon Applesauce

I've always been pretty obsessed with applesauce, and I have this weird thing where I like to eat it  as a side dish to spaghetti.  Like I said, it's weird.  But the when it comes to applesauce devotion, the Mister takes the cake in this house.  When he was little, his food allergies were way more numerous, so there wasn't a whole lot he could actually eat.  But, as luck would have it, one of his babysitters made her own pink, cinnamon applesauce and not only was it safe for mini-Mister to eat, it became his favorite treat.  D'awwww.  So since I first heard this story, I've been planning on giving a go at homemade applesauce.  That was 3 years ago.  Then this week rolls around with so many apples in the Crop Share, and Valerie is sitting across from me in the office telling me all about the homemade applesauce she makes all the time in the Fall.  Okay, no more excuses, the time has come!  So I got the run down from her and pledged to spend part of my day off making applesauce magic.

Did I make applesauce magic?  Oh yes I did!!  Now all I need to do is wake up the sleepy night-shift working Mister to see if it meets his high standards of approval.  And while he sleeps, I've been daydreaming about using some of this homemade applesauce in some Dairy, Egg & Gluten-Free Chocolate Chip Zucchini Brownies tomorrow!  Stay tuned for that recipe...and for the Mister's review of the applesauce.

One added bonus of this recipe is that I tried to rely mostly on the natural sweetness of the apples, especially since I tossed some Honeycrisp in there, and then the only extra sweetener I added was local honey.

**Update: The Mister has awoken and gives this applesauce two thumbs up! :D **

Homemade Cinnamon Applesauce


Ingredients:

8 apples, peeled, cored and cubed (I used a mixture of Honeycrisp, Smokehouse, Gala and Jonagold apples)
1/2 cup water
1/4 cup local honey
1 tsp ground cinnamon

Preheat oven to 350 degrees.

In a Dutch oven add in cubed apples, water, honey and cinnamon.  Give it a few stirs to evenly coat everything and then cover the pot and place it into the oven at 350 for about an hour.  You'll want to check it a few times and stir it just to make sure the apples on the bottom aren't scorching.

After an hour has passed, checked the apples and if they're looking nice and saucy, remove from oven and give it a good whisk just to break up some of the larger chunks and make sure that the honey and cinnamon are well blended throughout.  Taste and adjust with additional honey or cinnamon if you need it (mine was perfectly sweet with no addition needed).

Serve warm or allow to cool before placing in an air tight jar for use over the next few days.  My batch made a whole quart plus about a half-cup extra.


Friday, September 13, 2013

If You Must Poach...Poach Pears!

This past Valentine's Day I poached pears for the very first time, and maybe it was the effects of the great cough meds I was on for pneumonia, but this recipe I created on the fly turned out fantastic.  Pretty much I never want to eat a pear ever again unless it has gone to a red wine jacuzzi for an hour or two.  In fact, I want to go to the red wine jacuzzi with them.  I think poached would be a good look for me.  So whether you're planning a romantic date night at home, or you're just looking to dazzle your dinner guests, this is an elegant yet surprisingly simple recipe that will have your taste buds ooo'ing and ahh'ing with delight.


Red Wine Poached Pears with a Spiced Chocolate Drizzle


Ingredients:

2 firm, green pears (I used just slightly unripe Bartlett pears)
lemon juice
1/2 bottle bold red wine, I used a Cabernet
6 Tbsp sugar
4 Tbsp local honey
5 whole cloves
1 vanilla bean, sliced in half and seeds scraped out
1 heaping tsp blood orange zest (or other citrus)
Juice of 1 blood orange (or equivalent of other citrus, about 1/8 cup)
4 whole black peppercorns
1/8 tsp ground cinnamon
1/4 cup Ghirardelli semi-sweet chocolate chips (okay probably more than 1/4 cup, let's be real here)

Peel pears, preserving the stems and slice off a small part of the bottom to create a flat surface.  Squeeze a bit of lemon juice over them to keep the flesh from discoloring.

In a medium sized sauce pan, heat wine, sugar, honey, cloves, vanilla bean and seeds, orange zest, orange juice, peppercorns and cinnamon over high heat.  Stir continually until sugar is dissolved.  Reduce heat to keep at a rolling simmer, and cover pot to allow liquid to continue simmering for about 10 minutes.

Carefully add your pears to the liquid and cook on low heat for 1.5 to 2 hrs, turning occasionally to coat all sides and prevent any side from scorching.  When fully poached the flesh will feel soft on the outside, but should still be firm on the inside, so make sure you don't over cook and create mushy, fall apart pears.


Remove pears from liquid and set aside. Strain liquid through a fine mesh strainer to weed out the peppercorns, cloves, vanilla bean and some of the orange zest.  Return liquid to the pan and bring back up to a simmer.  Allow to simmer and reduce for about 10 minutes.  Then stir in your chocolate and whisk to fully melt and incorporate the chocolate until you have a slightly thick chocolate sauce.

Drizzle sauce over tops of each poached pear and serve immediately.  Serve with a small scoop of vanilla bean ice cream for added decadence.


Zucchini Ribbons in Oil & Garlic via Natasha Scott

Crop Share member Natasha Scott (not a Scott for long as I hear it's the 30 day countdown till her wedding, yay mawage!) can always be counted on coming up with super healthy takes on traditional recipes.  Her own blog Tash's Noshes has lots of great recipes, and they often contain Crop Share veggies and fruits.  Recently she got a spiral cutter and thus zucchini pasta was born.  This recipe hasn't made it to her blog yet, so I picked her brain for the yummy recipe to share with you all.  While a spiral cutter makes this a cinch, you can also use a potato peeler to achieve some of the same effect.  In the recipe below she just did a simple light oil and garlic preparation, but this would be fantastic with some pieces of grilled or sauteed chicken, or even try tossing with some marinara to see who all you can fool that they're eating pasta made from veggies!

Zucchini Ribbons in Oil & Garlic


Ingredients:
4 zucchini, sliced with a spiral slicer or a potato peeler
1-2 tsp olive oil
2 tsp garlic, minced
coarse ground salt & cracked black pepper to taste

Heat olive oil in pan over medium high heat, add in zucchini and garlic, and saute for 3-5 minutes, until zucchini is cooked through but still retains some crunch.  Season with salt and pepper to taste and serve immediately as a side dish or as it own pasta dish.

Chorizo & Quinoa Stuffed Acorn Squash

The start of this Fall Crop Share round is my 1 year Crop Shareversary!  My very first visit to Nalls was last years Block Party, and that day I signed up for the Fall Crop Share.  So as of tomorrow, I will have been a Crop Share member for a whole year.  So to say Crop Share has been life-changing for me would be an understatement.  Granted, it won't get all of you your dream job and have you fulfill your childhood wish of working with a pig, but it will transform your eating habits, create new family traditions, and enhance your cooking skills.  So last year's Fall round was my first experience cooking and eating a lot of hard squash varieties, and this recipe for stuffed acorn squash was my first go round with this type of squash, and is perfect for your single-serve size squash like acorn and carnival.  There's just a touch of chorizo to help give this a bit more heartiness, and then the super protein and fiber from the quinoa and the antioxidants from the dried cranberries make this a hearty yet healthy rustic dish.  And the base recipe for baking up the squash is a great trick to use on most squash to soften up the flesh, especially if you're planning on scooping it out to chop or puree.


Chorizo & Quinoa Stuffed Acorn Squash


Ingredients:

1 acorn or carnival squash, halved and seeded
1/2 cup cooked quinoa (I'm going to try this with some wild rice instead, too!)
1 Tbsp olive oil
1 tsp garlic, minced
1/2 sweet onion, chopped
3 oz chorizo, crumbled
1/8 cup dried cranberries
1/4 cup flat leaf parsley, chopped
Coarse ground salt & pepper to taste

Cook quinoa or wild rice according to package directions and set aside.

Preheat oven to 450 degrees.  Place halved squash in a baking dish with about 1/4 inch of water.  To allow the squash to sit better in the pan, slice a small part off the ends to allow them to sit flat.  Cover with foil and bake at 450 for 25-30 minutes or until flesh is soft.

Meanwhile in a saute pan, heat olive oil over medium high heat.  Add garlic and onion and saute until translucent.  Add in crumbled chorizo and cook until slightly browned.  Stir in dried cranberries and parsley and season with salt & pepper to taste.  For an added zing you can also add a shake or to of red pepper flakes.  I've also chopped up kale or Swiss chard and sauteed it with the chorizo (as seen in the photo above), so this is a great way to use up some greens and sneak in some more veggies to this dish.

Stir quinoa or wild rice into the chorizo mixture and then stuff each squash half with the filling until mounded up.  Don't pack it in too tightly though.  Then place it back in the oven, uncovered for 8-10 minutes just to get a bit of browning on the top.

I served this with some baked carrot fries, which are as simple as peeling the carrot, slicing them into sticks, seasoning with garlic powder, cumin, salt and pepper, tossing with olive oil and baking at 400 until they are golden brown.  Carrot fries are my jam in the Fall & Winter.  Forget sweet potato fries, carrot fries are where it's at!


Thursday, September 12, 2013

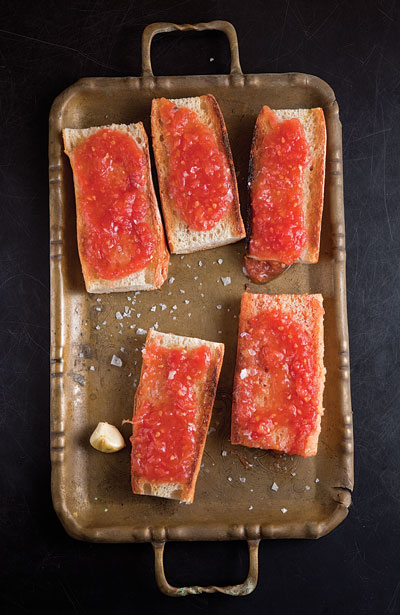
Pan Con Tomate via Saveur

If you've read your spoiler e-mail, you'll know you're getting an extra special surprise in your box tomorrow...a baguette from Panorama Bakery!  No?  Oui!  For those of you who attended our Block Party last Saturday, there's no way you missed Emmanuel from Panorama and the massive bakery display of carb loveliness.  So if you took any of those delights home, you already know how amazing their bread is.  Wait a minute, Tara, aren't you gluten-free, how do you know it's amazing?  Okay so in a moment of weakness, when Emmanuel first brought us samples, my French DNA got the best of me and I tried a nibble of the brioche.  Was it the best bit of bread I ever had in my life?  YES!  Did I pay for it for a few days after?  Ugh, yes.  Was it worth it?  YES!

So back in my gluten-full days, one of my favorite things to do with baguettes or any crusty French bread was to make a traditional Catalan dish of Pan Con Tomate.  Yep, bread with tomatoes.  And since you're getting tomatoes in this week's share too, you've already got half your ingredients!  These make a great appetizer, or pour yourself a glass of wine and slice up some cured meats for a dinner of assorted nibbles.  This recipe below from Saveur calls for you to grate the tomato and then spoon the puree over the bread, but the best way and the traditional Catalan way is to simply rub the slices of tomato onto the toasted bread to infuse it with just enough tomato goodness.  Then just reserve the broken down tomatoes for use in sauce for another meal!


Pan Con Tomate


Click through to view the recipe on Saveur...